Tag Archives: nas

The new NAS

PC parts for a custom NAS build

It’s close enough to 2023 now, and off the back of my QNAP being on borrowed time, it’s time to think about a new NAS. I’ve had a couple of NAS iterations over the years, starting off with a $200 HP MicroServer, then the aforementioned QNAP, and now, whatever I want to go with next.

I could, of course, go with another consumer-grade NAS like a Synology. Or even a QNAP if I am feeling particularly brave. Apparently, Synology units with processors that had the LPC CLK issue weren’t affected to the same degree as QNAP units were, because they implemented their LPC interfaces at 1.8V, preventing 2V over that circuit being an issue like it was in the QNAP units. That and/or in combination with a firmware update that somehow mitigated the issue, meant that a Synology unit would have been the more reliable choice at the time, and we wouldn’t even be having this discussion if I had purchased a Synology instead of a QNAP back in 2016.

Alas, I did, and we are.

Which brings us back to the original question: what kind of a NAS do I want in 2023, that will hopefully last 5-7 years, if not more?

I’ve been thinking about this for a while now. There are definite, distinct advantages to having an all-in-one unit like a QNAP or Synology. You get the smallest possible chassis, minuscule power usage, and the entire software experience that buying a QNAP or Synology gets you, which means that even if you’re going to run your own Docker containers and just use the software to manage your storage, it’s definitely a more cohesive, user-friendly experience compared to rolling your own OS. But even after all that, I’ve been drawn to the idea of building my PC to serve NAS duties for a while now.

Why? It comes down to hardware, both in terms of choice and flexibility.

Buying a consumer-grade NAS like a QNAP or Synology means you’re buying into their ecosystem, with all of the advantages and disadvantages that entails. Yes, you can upgrade the RAM and install your own drives but that’s about it in terms of upgrades. With the exception of some of their pricier units, you can’t drop-in a PCIe card to add discrete graphics, or more M.2 drives, or even 10 GbE, if that ever becomes a thing at home. Maybe it will, maybe it won’t.

There are some Synology units that let you buy a PCIe expansion card that lets you add 10 GbE as well as more M.2 slots (in addition to the ones you already have), by the time you pony up for one of the pricer Synology units and the PCIe expansion card, you’ve basically spent as much as you would have if you picked your own parts and built your own PC from scratch, with none of the benefits of having custom hardware. It’s a trade off. I think it makes way more sense to buy a QNAP or Synology NAS, compared to building your own, than it does for you to buy a pre-built gaming PC from a major computer retailer like Dell or HP, purely because you’ll get more value out of a consumer NAS that you do out of a gaming PC that uses non-standard parts and layouts. You’re far more likely to want to upgrade your gaming PC within its expected lifetime than you are your own NAS, and you’ll appreciate standard PC components at that point, way more than you would if you were to upgrade your NAS. But I digress, and that’s a topic for another time.

When you’re building your own NAS out of commodity PC hardware, you have the complete freedom to choose which standard PC components you want, and the flexibility that affords you down the line. You might not ever need to upgrade your QNAP or Synology CPU in the lifetime of your NAS — but don’t you wish you could, when something better comes along?

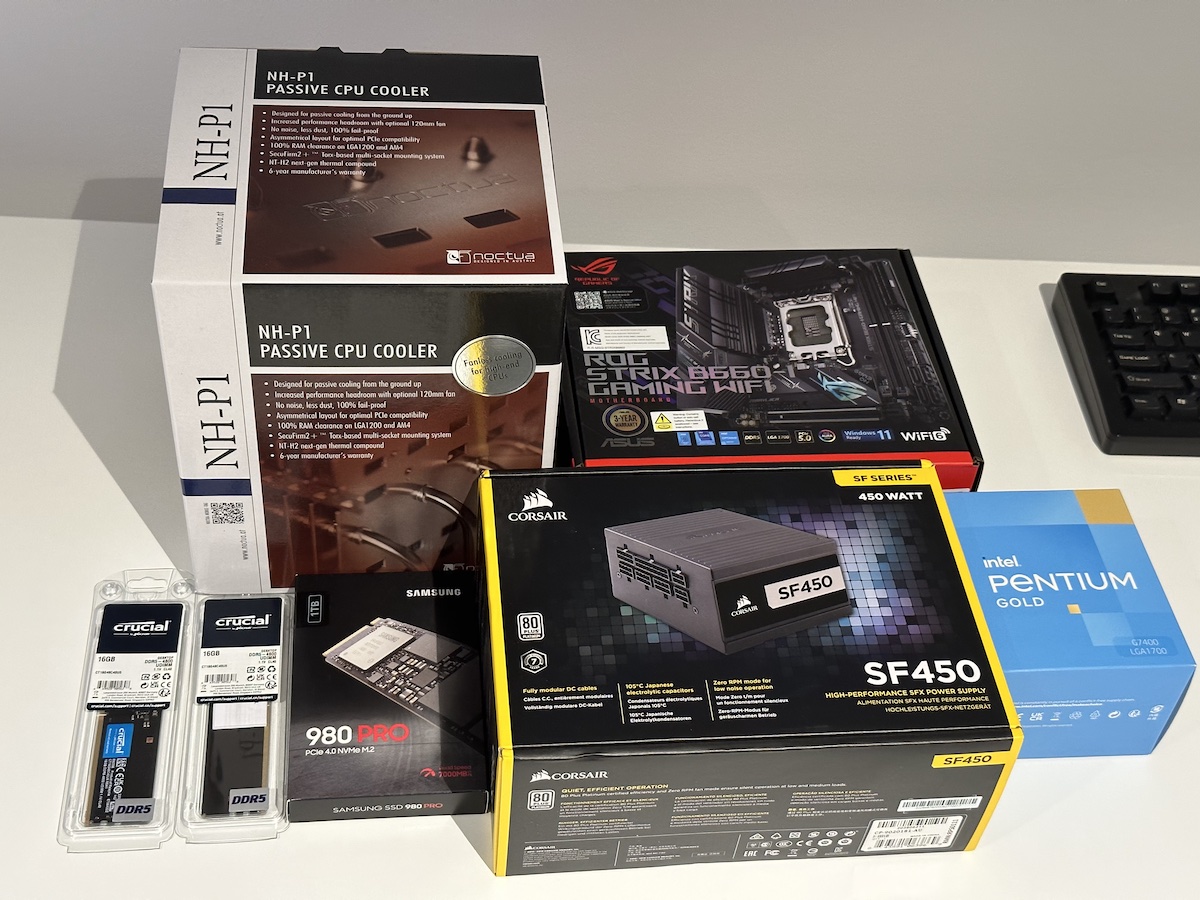
But if there was a single reason I wanted to build my own NAS, it comes from being able to have access to hardware transcoding. Specifically, Intel Quick Sync Video.

While video transcoding isn’t generally a problem for me right now, that’s not to say it won’t be in the future. The Celeron J1900 in my current QNAP supports Quick Sync, and I haven’t had an issue streaming most of my content to iOS devices via Plex due to the wonders of direct play and most of my content being in a format that’s compatible with my devices. But between various CPU architectures, Quick Sync support for different codecs and formats varies. My current CPU, while it supports H.264, will only support decoding HEVC H.265, not encoding it, with zero support for newer video codecs like VP9 or AV1, or even 10 or 12-bit HEVC H.265 which is sometimes used by HDR versions of those videos. I don’t currently have Quick Sync video working on my current QNAP, but that is probably a configuration issue on my part; it’s entirely possible I haven’t set it up correctly in the Plex container.

Not supporting hardware-accelerated video encoding/decoding means we’re back to software decoding. And if YouTubers are to be believed, AV1 is going to be the next big thing, so even if we have to wait for a couple of years for it to be adopted by content farms, won’t I be glad I’ll have picked a 12th gen CPU that can handle decoding AV1 in hardware, as opposed to some Ryzen chip that would have had to rely on sheer CPU grunt to do software encoding?

While this might not be a big deal right now, it’ll matter if everyone starts using the royalty free, and even more efficient AV1 format. If that happens within the remaining lifetime of my QNAP, that’ll be an issue for me because it will mean I’m back to software decoding everything. I’m using software transcoding now, and it’s an extremely poor experience on a quad-core 2.0GHz CPU, even on my local network. The good news is, only Intel Arc has access to AV1 hardware encoders, which means everyone else has to throw CPU grunt at the problem, if they want to encode their content in AV1.

The other main advantage of rolling your own NAS hardware is that you can run whatever OS you want on it. While there are technically ways you can run other OSes on QNAPs or Synology units, it’s a hack. Building my own NAS lets me choose between straight Linux, like whatever version of Ubuntu that I ran on my HP Microserver, or the more storage-focused flavours of Linux/BSD like Unraid or TrueNAS. TrueNAS in particular is interesting because it is known for natively implementing OpenZFS, which is generally regarded as the best storage-focused filesystem. I don’t currently have a need to run any of the crazier storage configurations afforded by ZFS as I’ll be limited by the hardware and case that I’ve chosen (at least to begin with), but it’s nice to know they’re an option, if I decide to do that later on down the track.

Continue Reading →

The QNAP of Death

Alternate title: the day my NAS died

A QNAP NAS with System Booting text

Not quite the same System Booting text I was greeted with, but close enough. Excuse the dust.

System booting? Yes but the system has been booting for literally hours now. If it hasn’t booted within five minutes, there’s something wrong.

And dear reader, there was indeed something wrong. I tried all the usual stuff; turning it off and on again, leaving it off for a couple of days, pulling all the hard drives out, turning it off and on in between all of those steps, but nothing worked, nor did it give me any kind of video output to indicate what might be wrong. It turned on, but wouldn’t boot into the OS. That probably should have been my first clue that although something was wrong, maybe it wasn’t completely dead. And if it wasn’t completely dead, then maybe there was something we could do to fix it.

But after unplugging every piece of hardware I had added to the QNAP and returning it to the stock hardware configuration, the thing would still not boot up properly, giving me that same error message. System booting. Whatever was wrong with it, it wasn’t because of something I had added or done to the system, which probably meant it was hardware-related. Ugh.

With my extensive troubleshooting prowess exhausted, it was time to turn to old mate Google.

Google immediately led me to a 100-page forum thread about the issue on QNAP own forums. This was either very good, or very bad. In my case it meant it was initially very bad because it meant I had to read through most of it, but then things turned out very good because within those 100 pages, there was the trifecta: a known recurring issue, exact steps to diagnose that specific issue, and a fix that worked for enough people for it to be considered the official unofficial fix.

The problem, as it was described, is some kind of “degraded” LPC clock. As I understand it, basically there’s some kind of timing component that keeps things in your PC running on time for lower-pin (Intel’s definition of lower-pin here actually means 1170 soldered pins) processors like the Intel Celeron J1900 in the QNAP that I have. What happens is that in some systems, including in my QNAP and even some Synology units, that the circuit for this LPC clock degrades over time due to “reasons”, and eventually reaches a state where it fails to provide a stable clock to the system, meaning that the CPU doesn’t work like it should. Or something along those lines, anyway.

According to the forum post it’s remarkably similar to an issue that affected the Intel C2000 Atom processors, which Cisco and Synology both issued advisories about all the way back in 2017, although that case was slightly more serious as it caused C2000 Atom-equipped gear to fail after as short as 18 months. In the case of my QNAP, it lasted over six years. Not bad, but buyer beware, I guess, not that you’d be able to tell this kind of thing at the time of purchase.

Thankfully, diagnosing the issue is pretty easy. Use a multimeter to measure the voltage between some pins or pads on the motherboard, depending on your specific model of QNAP, and if the voltage shows over 2V, your LPC CLK is likely broken and needs to be fixed if you want to use your NAS again.

The fix is easy enough as well. Because we need to drop the voltage of the LPC CLK signal, we can drop in a resistor. Experimentation by some helpful forum members indicated that a 100 Ohm resistor, soldered between the “negative cycle transistor” and ground, will restore the voltage to a correct value to allow the LPC CLK to supply a correct clock signal to the CPU.

Simple, right?

There was just one problem. Well, besides “the problem”. I don’t own a multimeter, nor a soldering iron. Oh, and I don’t really know how to solder. I’ve soldered before, but I wouldn’t say I’m particularly good at it. But as my old swimming coach used to say, no one is born knowing how to swim or solder, so I grabbed a cheap and cheerful soldering iron, some solder, a multimeter, and prepared myself for the hackiest soldering job in the world. Yes, it was really that bad. No, I didn’t trim the ends of the resistor. Yes, I probably should have. Yes, I managed to melt a little plastic connector next to where I was soldering, but in my defence, it was impractical to pull out the entire motherboard for easier access, so I kind of had to do it in situ while it was still attached to the case, which made it all the more awkward. No, I’m not going to show you a picture. Suffice to say, I got the job done. Just.

After all was said and done, and I put my drives back into the system, it booted up just fine. Not that I didn’t expect it to, given so many other people had had success after attempting the same fix, but it was still a relief. Getting the system back up and running again meant I didn’t have to try and go to lengths to recover the data I cared about, never mind wondering what was on there that I might have forgotten about in the first place.

I wish that was the end of the story. Alas, the forum had one more golden nugget of information to dispense, and that was that the fix was only temporary. Continued degradation of the clock timer was inevitable, and the next time it failed, there was no guarantee it would be fixable with any kind of resistor. It was hard to estimate how long the fix would work for, but six months to a couple of years seemed reasonable. Reasonable, but only if you were willing to put up with the fact that your NAS might die at any moment, and maybe even be completely unrecoverable from that point on.

Which worked for me, because now I knew that it was on the way out, it was time to build a replacement.

NAS thoughts

IMG_3508When I moved to Brisbane, I decided against bringing my NAS with me. I can’t remember my reasoning at the time, but it was probably something along the lines of “my external storage requirements won’t be as extravagant if I’m living alone, without an NBN connection”. Besides, I had my directly-connected external USB hard drive if I needed to store anything, the same external hard drive that I’m using for Time Machine. With that mindset, I loaded up a couple of my favourite TV shows and things I thought I’d be able to watch, and figured I could either re-acquire the rest or collect it the next time I was in Hobart.

It’s been long enough that I’m starting to miss my media collection. I’ve re-acquired a bunch of stuff in the meantime, but it’s just not the same, you know? My ad-hoc acquisitions aren’t of the same calibre as my carefully-curated collection back home, and what’s more, I’m starting to worry about the ever-shrinking space on my external hard drive. Plus, there’s the stuff that just isn’t available anymore, or is enough of a pain to re-acquire that I haven’t bothered.

Which is why I’m thinking about another NAS. A NAS solves all my problems: it lets me access all my media from a device other than my Mac, it helps alleviate the storage situation on my external hard drive, and if I bring a NAS back home and make another copy of all my media, then I’ll be able to access all my old media, like nothing ever changed.

But it’s 2016 now, and NAS devices are a touch more complicated than buying a $200 HP MicroServer, stuffing as many drives as I can in it, and calling it a day. I can still buy a MicroServer, of course, but they’re a touch more expensive now, so what else is out there?

Continue Reading →

Six drives in a four-bay MicroServer?

Read my original MicroServer intro post right over here!

The eagle-eyed among you will notice that there are four drive bays in the HP MicroServer, and yet I have managed to squeeze six drives in there. Not really that impressive, to be sure, but still a decent effort.

How?

If you’re prepared to forego your 5.25″ bay and optical drive, essentially you’re after something like the Nexus DoubleTwin (sorry, PC Case Gear don’t seem to stock it anymore?) or the OWC MultiMount. Same thing, different name — it’s just something that mounts in your 5.25″ bay and allows you to fit two standard 3.5″ drives in there.

What about the SATA end of business, you say?

The good news is that there’s technically two extra SATA ports you can use — one is internal and designed for the optical drive in the first place, and the second isn’t a SATA port and it isn’t internal. Instead, it’s an eSATA port and it’s located on the outside.

The bad news is that these ports are also locked to SATA I speeds, which means a max of 1.5Gbps speeds from those ports — not a huge concern if you’re just using those ports for boot or storage drives, but you don’t want to be limiting your RAID array if you’re adding those drives to an array.

Luckily, there’s an OCAU post that contains the instructions to flash a modded BIOS to the machine to fix that right up. If you’re thinking of getting one of these machines, do this BIOS flash first, then start putting in drives and setting up software and whatever else. I know it sounds potentially dodgy, flashing a modded BIOS and all, but you can always re-flash back to stock if you find that you want slower array speeds. Plus, plenty of people have been running that modded BIOS without any issues at all, so it should work just fine. I’ll cross my fingers for you, anyway.

Oh, and that other eSATA port on the back? You just need an eSATA to SATA plug, and extra molex splitter or two, and away you go. Easy, right?

This post part of Blogtober 2011, just a little thing of mine where I (attempt to) post something up on my blog every day in October 2011.

HP MicroServer

There’s been a few phonomena sweeping the wider Australian tech community of late, and I just wanted to tell you about one that I managed to get in on.

The HP MicroServer.

Officially part of the the HP ProLiant MicroServer series, the N36L is a small box with a whole lot of potential and even more potential. Officially, it’s designed to satisfy the storage requirements of small to medium businesses by providing them with easy, expandable storage in a convenient form factor. Officially, the base configuration comes with four non-hot-swappable drive bays for 3.5″ drives, a dual-core 1.3GHz AMD Athlon II Neo processor, 1GB of ECC RAM, and a stock 250GB drive to get you started.

Unofficially, the MicroServer is the best piece of tech I’ve bought in recent memory — and as my parents, friends, and even the local postie will tell you, I buy quite a bit of tech.

It all started when I was reading a thread about it on one of my favourite forums. Forum member Brains posted up a deal a HP reseller were running that offered one of these MicroServer machines in the base config for a bit more than $200. Long story short: I put an order through with that reseller, waited a while, eventually received an email saying stock was delayed, waited a little longer only to be rewarded with another “stock delayed” email a few weeks later. By that time HP themselves were offering the original deal for the second time ($199 delivered to my door), so I requested a refund with the reseller and placed an order with HP. A few more weeks later, and the MicroServer arrived. Now the only question that remained was what the hell I was going to do with it.

Up until now I’ve been storing all my media on individual drives. Buy a drive, stick it in my PC, share it over the network, and fill it up. Rinse, repeat. This scheme worked pretty well for a while, but I knew I couldn’t keep it up forever (I was fast running out of SATA ports), plus there were many aspects of this storage system I wasn’t quite happy with. For one, my PC uses about ~200W on idle; leaving it overnight is just asking for a lecture about power bills. Downloading stuff overnight can be done by my Mac, but even that isn’t optimal.

So, what I am doing with my MicroServer? First and foremost: it’s a storage box, my very own NAS. I’ve filled it with 4x 3TB drives, maxed out the memory with 2x 4GB sticks of ECC RAM, and added in my own 500GB drive in addition to the stock 250GB that comes with it for a total of six drives.

In terms of software, it’s currently running those drives in a software RAID 5 under Ubuntu 11.04 with the help of mdadm for RAID management, giving me roughly 8.5TB of usable space after file system formats and what ever else. I’m currently serving the array across the network using SMB, and I get decent enough transfer speeds across my Gigabit network, roughly 75Mb/s stable.

But wait, there’s more!

It’s also currently serving a Deluge daemon accessible though a web user interface, running a SABNZB+ instance also accessible through a web UI for Usenet downloads, leveraged by Sick Beard, and finally, because all my media is now in the one spot, on a machine that stays on 24/7, a Plex/Nine installation so I can access stuff from my iOS devices (the dual-core seems to transcode 6mbps 1080p streams on-the-fly just fine).

Oh, and it’s also hosting a temporary Minecraft server for myself and a few friends.

All this on a machine that uses about 40W idle, even when loaded up with 6 drives and 8 times the amount of original RAM? Like I said, the HP MicroServer is one of my best tech purchases yet; it perhaps wasn’t all that cheap after all the upgrades, but still cheaper than a Drobo or similar 4-bay NAS boxes, and quite a bit more capable. I’ve heard other people that have also had success with putting Solaris on it for ZFS, FreeNAS for something a little more lightweight (but still equally as capable), and some other, slightly crazier dudes running all sorts of ESXi virtualised environments, stuffing 4x 2.5″ drives in the optical drive bay, putting RAID cards in them, and even taking a dremel to their machines in order to stuff yet another 3.5″ drive below the optical bay.

Me? I’m not quite so serious, but my little MicroServer still does everything I want it to do.

Expect a few more posts on this in the coming days, and let me know if you have any other questions. Further reading to get you started: the insanely long thread on Overclockers Australia about it.

This post part of Blogtober 2011, just a little thing of mine where I (attempt to) post something up on my blog every day in October 2011.