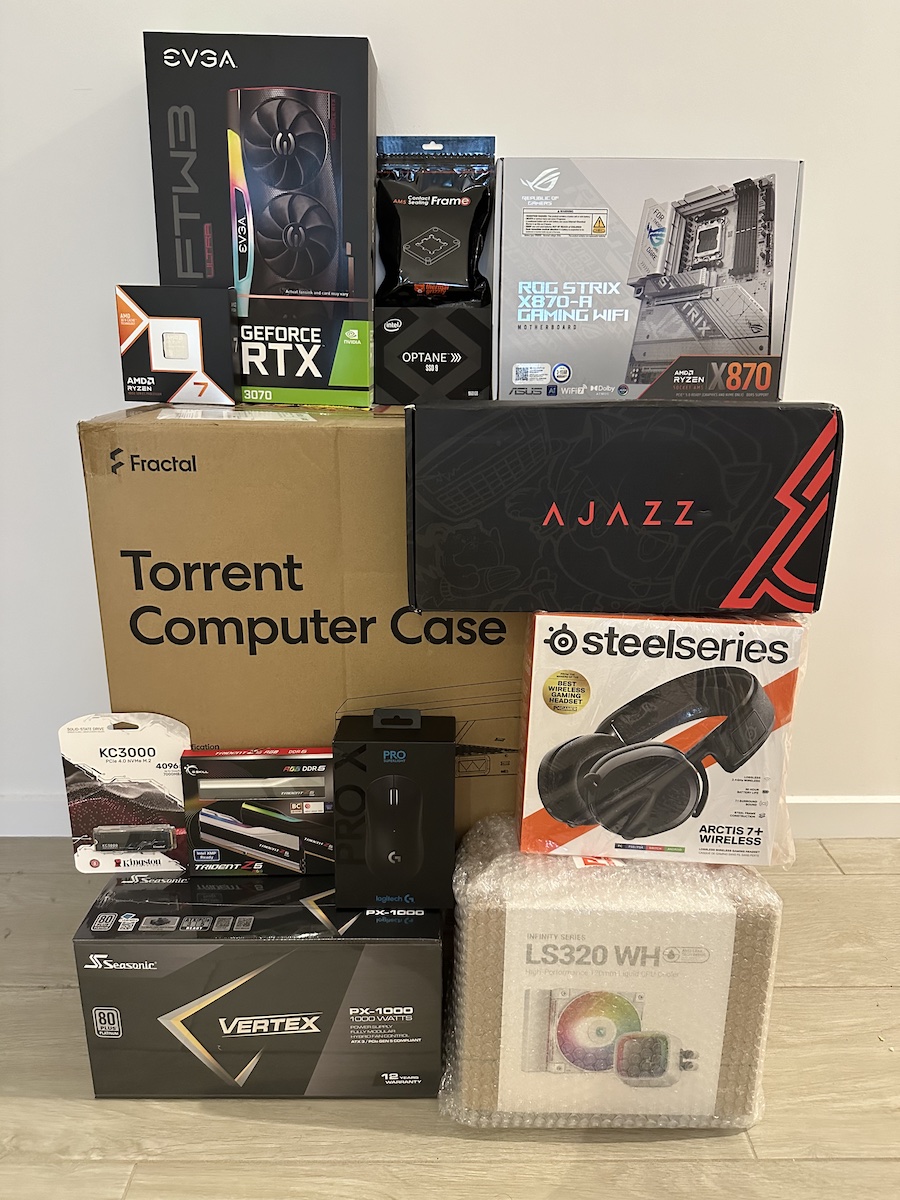
Stories from the road: The Charmander Expedition

The Charmander B-Side Label sticker

Ugh. This Pokémon store didn’t have it either. Not only had I been to three different Pokémon stores in three cities by that point, but none of them had the Charmander sticker I was looking for. The tiny Pokémon Centre at Tokyo Station in character street didn’t carry stickers at all, and this one, the Pokémon DX in Tokyo, had the stickers but was out of stock of more than just the Charmander I was after.

I had first come across B-Side Label stickers at the Fuji-Q gift shop, but it wasn’t until I stumbled one of their brick-and-mortar stores in Kyoto that I realised that they were a real thing of their own and not just some collaboration between a sticker company and some big names like Nintendo/Game Freak and whatever anime you care to name.

Being somewhat of a sticker connoisseur myself, I was instantly drawn to their cool designs and incredible range. They covered basically every popular anime, and plenty of other subcultures I didn’t recognise. If you managed to go to an actual B-Side Label store, they had entire books of their range, or you could browse their entire collection on an iPad.

I had seen Pokémon stickers previously at other Pokémon centres, of course, but it wasn’t until the Osaka Pokémon centre that I decided I wanted a small set. But which ones? That was obvious. Pikachu, of course, plus the starter Pokémon and legendary birds from the original 151. While Gen I wasn’t technically the generation I grew up with, it was close enough and far more recognisable, not to mention far more iconic. Anything after the first 251 Pokémon might as well not exist.

I managed to pick up Pikachu, the original starters, and the legendary birds at the Osaka Pokémon Centre, minus a Charmander. But that didn’t matter, because I knew I had an extra couple of days in Tokyo, and surely, surely, one of those Pokémon centres would have a Charmander, right?

Wrong. So wrong.

Now that I had been to most of the Pokémon centres in Tokyo, it was time to go to plan B: an actual B-Side Label store. There had been one in Osaka (where I got in trouble for taking a video in the store, even though there weren’t any signs saying it wasn’t allowed), but the B-Side Label store in Tokyo was a little out of the way, and involved two short train rides and a 2.2km walk. By that point it was getting late, maybe 8 or 9pm, and I had probably already done 20,000 steps at Tokyo Disneysea and was beginning to feel it, but I knew that this would be the last chance I had to find a Charmander sticker to complete my set.

All I can remember is how I felt a wave of relief when the Harajuku B-Side Label store had the Charmander sticker I wanted. Missing out on the sticker wouldn’t have been the end of the world, and would have given me yet another reason to go back to Japan (or just buy it online, if that was even possible), but otherwise I would have had a unique sticker collection.

My Pokémon stickers would have been missing a Charmander, but I had a good reason for when someone asked about why I was missing Charmander.

Well, I would have if the Charmander Expedition wasn’t such a rousing success.

Apple Watch Bands, Ranked

The 2023 Pride Edition Apple Watch band outside the Apple Store

This is my ranking of all the Apple Watch bands you can currently buy:

  1. Sport Band/Nike Sport Band
  2. Milanese Loop
  3. Woven Nylon
  4. Silver Link Bracelet
  5. Trail Loop

I have a problem, and it involves Apple Watch bands.

I now have third-party versions of most kinds of the Apple-branded (i.e. not Hermès) Apple Watch bands. It’s not that the genuine Apple ones are bad, but for the few genuine bands I have compared to their third-party equivalents, there’s just not enough of a quality difference to justify the difference in cost. Especially when we’re talking about the liquid silicone rubber sport bands, or the nylon sport loops, no matter if they’re called fluoroelastomer or whatever other fancy term Apple uses.

Apple’s first-party watch bands are nice and all, and their sport bands have a better-feeling silicone/rubber texture than the third-party ones, but it quickly becomes cost-prohibitive to have any more than one or two colours, especially seeing you can only wear one at any given moment in time. Multiply that by the multitude of band styles, seasonal colour variations, and special editions, and third-party fakes quickly start to become the only way you can stay ahead of the watch band game.

Genuine vs third-party differences aside, there’s now so many different types of Apple Watch bands that it’s hard to know what bands you might like, short of buying them all and trying them, or going to your local Apple Store and trying them on in-store.

But by the same token, because there’s so many, if you have certain preferences for materials, looks, or both, you can choose a watch band that suits your own personal tastes.

If I had to pick watch bands based on personal preference, it would be something like so:

  1. Milanese Loop
    The Apple Watch band I wear most of the time is the Milanese Loop. Because I have the stainless steel Apple Watch, the Milanese Loop matches the polished, shiny look of the stainless steel really nicely. It uses a magnet to hold the strap against the band, which is always cool, and it’s both understated enough to not be too flashy on first glance, as well as being slightly fancy if you take a closer look. It’s only real downsides are the fact that it isn’t casual as something like the Sport Bands, and it’s heavy — not as heavy as the Link Bracelet, but definitely heavier than sport bands or nylon watch bands.

  2. Sport Band/Nike Sport Band
    It’s hard to go past the venerable Sport Band and the Nike Sport Band, mostly due to the fact that they’re the best watch band for most people. They’re available in a huge range of colours, and while they use the simplest pin-and-tuck fitting system that might not provide the fitting granularity or fine-adjustment capability of something like the Sport Loops and Nike Sport Loops, they’re casual but smart, and light but durable. The best thing about the Sport Bands is that they’re extremely hard to fault, which is probably why they’re regarded as one of the best Apple Watch bands of all time.

  3. Woven Nylon
    The Woven Nylon watch bands, despite no longer being available from Apple new, are probably the most traditional Watch bands you could have bought. Short of a real leather watch band, the Woven Nylon were light and had a classic pin and buckle style arrangement that was like the pin and loop design of the Sport Bands, only less modern. But still, the Woven Nylons look great with basically any outfit, and while they aren’t as formal or flashy as the Milanese or the Link Bracelet, they still represent good value both in terms of practicality and monetarily.

  4. Link Bracelet
    The Link Bracelet is the kind of watch band you’d expect to wear with actual high-end watches. With the exception of the higher-priced space black Link Bracelet (which is at least partially justified by the special DLC coating that makes it very, very scratch resistant), you would wear a Link Bracelet with your Apple Watch if you were attending some kind of formal event, for example, and still wanted a high-tech watch instead of a traditional Rolex or similar. By that same token, I probably wouldn’t recommend it as a daily driver.

  5. Trail Loop
    I am generally against Velcro watch straps. They might seem like a simple, easy option that’s suitable for everyone, but this belies the fact that they’re more utilitarian than I’d like. There are two major downsides to the Sport Loops and Nike Sport Loops that Apple sells. Firstly, they feature the loops on both sides of the watch band, which puts loops in contact with your skin, not the watch band itself, and worse still, show the loops on the outside of the watch band which looks awful on your wrist. Secondly, the sound velcro makes when you’re taking it off is always jarring, and you’ll hear it every day when you take your watch off to charge. That being said, I begrudgingly acknowledge their overall place in the hierarchy of Apple Watch bands thanks to the sheer number of Sport Loops and Nike Sport Loops. So if you absolutely must wear a Velcro band, the Trail Loop is the best of the worst purely for the reason it has the loops only on one side of the Watch band. While the colour selection isn’t great, it is one of Apple’s newest Watch bands, so that’s kind of expected.

Stories from the road: Uncomfortable

The entrance to Super Nintendo World at Universal Studios Japan

Of all the places in the world that I’ve been to so far, none have made me feel as uncomfortable as Japan.

This can be mostly attributed to the language barrier. Japan, despite being a huge tourist destination, has a unique combination amongst Asian countries of having a generally introverted populace1 with scarce English skills, and looking back on it now, it was both of these factors that made me feel so uncomfortable while I was there.

Of the half-dozen Asian countries I’ve been to, I’ve been fine being an Asian tourist that blends into the locals, with passable Chinese language skills. Even if I couldn’t understand every thing that was being said, I could at least understand some things. Not having that ability with Japanese, in Japan, made me extremely uncomfortable.

It made me realise how I’ve taken my meagre language skills for granted. I’m barely conversational in Mandarin, but even that has always felt like enough, for the places that I’ve been to.

But in Japan, having people speak Japanese to me and not understanding a word of it, is uncomfortable as hell.

It made me uncomfortable speaking English back to people who spoke Japanese, like I was operating under the assumption that they understood and spoke English. When they didn’t, it made me uncomfortable pointing at things on menus to communicate what I wanted, like I was some kind of mute toddler. It made me uncomfortable not knowing if the handful of Japanese phrases I learned were being pronounced correctly, or whether they understood what I was saying when I said them. It made me uncomfortable speaking Japanese in the first place, because then they might assume I knew Japanese, and keep speaking Japanese to me. It made me uncomfortable playing the part of the ignorant foreigner, all while some Japanese assumed I was also from Japan and could speak Japanese.

For one of the few times in my life, I was truly outside of my comfort zone. And it was great!

Being outside my comfort zone meant that I was finally able to experience a culture and language other than my own Chinese background. I’ve travelled enough with my parents and relatives to enough countries to know that I wasn’t getting the full experience when overseas, but doing things on your own is a different thing entirely. Despite how uncomfortable I was conversing with locals, I was able to navigate around Japan perfectly fine on my own, with a little help from Google Maps and the English signage at train stations. I did and saw about 85% of the things I had put on my list to do and see, with a few things left over in case I ever decide to go back.

Continue Reading →

Character

Brisbane Treasury Casino and Hotel, as viewed from Reddacliff Place

Cameras in phones are probably a little too good these days. I can pull out my iPhone, snap a pic of whatever I’m looking at, and know that every detail will be captured, timestamped, and geo-tagged. I’ll even get a few seconds of video to go along with my photo, all in less time than I spent thinking about taking the photo in the first place.

Film, by comparison, has none of those benefits.

With film, I have to think about what I’m taking a photo of. Not because I’m worried about using one of my 36 exposures on whatever roll of film I’m using — although I am limited by the total number of exposures I have available to me at any one time, that typically isn’t a concern — but because it forces me to think about composition and framing, even focus, more than digital does. Digital might have ever-increasing megapixel counts which make cropping an easy way out if you didn’t get your framing right the first time, but there’s no such advantage with film, where your negatives will betray your imperfect framing every time.

When you’ve shot with film for a while, and particularly when you put the same speed and type of film through your camera dozens of times, you notice that your photos get a certain look about them that you don’t see with photos from your iPhone. It’s film grain, sure, but it’s more than that. It’s the way certain colours are more noticeable than others, the limited dymanic range of film, and the contrast between the light and dark parts of the image that work together to make the whole thing the slice of life that you captured at the time. Some parts might be out of focus, intentionally or otherwise, but all of it contributes to something that digital photos just don’t have these days.

Character.

When I’m taking a photo, if I want everything to be in focus, if I want every pixel to be perfect, even if I want everything to be HDR’d to the n-th degree, then I’ll pull out my iPhone and snap away. I know that when I take photos with my phone, the photos I take are as good as it gets, at least within the limits of camera technology that we have in phones these days, short of spending thousands on a pro-level camera and lens. And obviously, if I want to take video, I’ll pull out my iPhone. But if I want to capture an interesting perspective, or convey what the scene looks like to me, as opposed to what it actually is, that’s a job for my film camera, and an exposure of Ektar 100. If I want the sky to be overexposed, if I want shadows and highlights in equal measure, if I want colours to pop without being overbearing, then film is the only choice.

Obviously, there are a plethora of advantages to digital that film just doesn’t have, otherwise we’d all still be shooting film. But there have been so many advances in computational photography that it has pushed digital photography to the point where it’s more or less boring — perfect, life-like photos every time? Who wants that? Perfect photos might be all well and good for most people, most of the time. But the other times, I want my photos to have some imperfections.

I want my photos to have character.

Which makes film the perfect medium to be shooting on. And if I’m shooting film, there’s nothing more fun that shooting with a film rangefinder.

Selective photo permissions in iOS sucks, actually

A couple of years ago, Apple introduced the idea of selective Photos access. The idea was so that if you let an app have access to specific photos, then the app couldn’t do something like steal all your photo metadata straight out of your camera roll, including location. Great for apps that you didn’t necessarily trust to abuse that access, given that there’s was no way for you to tell if an app had collected all the metadata from all your photos and uploaded it into a database somewhere.

Apple’s solution, introduced with iOS 14 in 2020, was to allow you to select which photos an app has access to, which sounds great in theory, but has become a bit of a usability nightmare.

The problem is that by only selectively allowing an app to access your photos, you’re effectively choosing between two, kinda sucky options.

If you selectively allow access to photos, it means that every time you want to share a new photo to the app, you have to take the photo (using whatever camera app you want, whether that’s the stock camera or something like Halide), jump into the app, hope it has a deep link to the Settings page that allows you to change which photos it has access to (not all apps do, and the implementation to select photos can differ between apps), select the new photos that you just took, and then finally send them using the app. This three-step dance of taking, selecting, and sending happens every single time you want to send a photo using an app that only has selective access to your photos, which adds a huge amount of friction to a process that should be as few steps as possible.

But what’s the alternative?

The other way you can get around this taking/selecting/sending process is by using whatever app you’re sending the photos with, to take the photos with in the first place. Most apps have an integrated camera option that allows you to take a new photo right from within the app, then send that directly. And while this is a much simpler, more streamlined process than the snap-select-send dance, it comes with its own caveats. Firstly, there’s no guarantee that these photos taken directly within apps will be saved to your camera roll by default. While some apps offer to save taken photos to your camera roll automatically, apps like Snapchat make you tap a button before the photo you’ve taken is saved to your camera roll. But when you do, these photos taken from within apps seem to miss out on some normal photo metadata, like camera/lens info, exposure, focal length, location, and they don’t seem to be able to be Live Photos or be recorded in different image formats, either.

Screenshot of two comparison photos, taken using the Steam Chat app on the left, and using the stock camera on the right.

Note differences in metadata between these two photos. Photo on the right taken using the Steam Chat app on the left, and using the stock camera on the right.

Without looking too closely at the technical details, photos taken within apps might also be missing out on some of the technical features afforded to the stock camera app, like being able to automatically switch to the ultra wide lens for the macro mode on recent Pro-model iPhones, for example, nor do you seem to get access to the camera modes and effects of the stock camera app. This means your photos when taken using apps aren’t necessarily going to be the same as ones when you take them using the stock camera app. All of this is still probably fine, if all you’re doing is taking photos for the purposes of sharing to others, but you might miss that data months or years later. There does seem to be exceptions to this, as clearly third party camera apps like Halide can capture in different formats, but I think Live Photos are a stock camera app exclusive.

So when you want to share a photo to an app that doesn’t have access to your entire location history from all the photos in your camera roll, you can either:
– do a snap-select-send dance every time you want to send a new photo using that app, keeping your photo metadata intact and ensuring the best possible photos
– take and send the photo directly from within the app, which is a much more simplified process, but results in photos with no metadata and other features that you might want later, like Live Photos, and maybe even things like depth information.

And obviously, this is only for photos. For screenshots, the situation is even worse, and you have to do the snap-select-send dance every time.

What’s the fix?

Unless I’m overlooking something here, isn’t it as simple as letting apps only access photos taken in the past one or two hours? If you’re sending a photo that you just took, it seems unlikely that you would be doing it more than say two hours after it was taken, and while a higher number would give more leeway for this, I’d be concerned about an app having a rolling 12 or 24 hour access to your photos, because then we’d just end up with the same problem that we had originally if apps have access to all your photos, but one or two hours hopefully means that apps you haven’t recently used, won’t be able to take a rolling 1-2 hour peek at your photos.

Maybe the better solution is to prevent apps from having access to photos metadata in the first place. Then none of this would be an issue, and we could go back to the time when apps had access to all photos, all the time. Selective photos metadata might not be technically possible, but that would be the ideal.

Stories from the road: Thirty Two

Are we old, Melissa?

I don’t think so, but isn’t age subjective? Aren’t we the ones that decide if we’re old or not?

It’s late January, 2023, although it probably won’t be by the time you read this. We’ve just celebrated Chinese New Year in Malaysia for the first time in a long time. We’ve eaten out more times than I can count, received heaps of red packets, had all the Chinese new year snacks that you can’t normally get outside of Asian countries, and been visited by all the distant relatives I only see every time I’m here. It’s all been great.

I was kind of indifferent about this trip when I booked the tickets, but now that I’m here, I’m glad I decided to come. While it’s always great to go back every few years to visit my grandparents and see the uncles and aunties I haven’t seen in a while, not to mention catch up with the cousins that are still around, el rono put a significant dent in any plans we might have made. So this trip, the first in five years and the first after Covid, is a little special. Even though we might make plans to meet up again in a year or two, there’s no guarantee that will happen due to any number of circumstances. Maybe next time instead of avoiding the spicy cough, we’ll be avoiding the plague, or worse. But we’re making the most of this trip now that we’re all here, and doing all the usual things. It’s all been great, and I wouldn’t have it any other way.

But something feels different, somehow. Most of our cousins are now somewhere between their late 20s and mid 30s. Three are married, and while only one has children of their own, I get the feeling that most of us are starting to feel the realities of life creep in. No longer are we carefree teenagers in high school, or uni students mooching off our parents, but now most of us are actual adults that have settled into our own lives, our own full-time jobs, and in some cases, even our own houses and mortgages.

What this means is that some can’t take leave from work for the whole time I’m here, or that they have to be back to work or study in another part of Malaysia soon after the Chinese New Year is all done and dusted.

It’s a different vibe, for sure.

Which is why, as someone who isn’t married, as someone who doesn’t have children, I feel as though it’s at least partly my responsibility to make sure that even though we are older, that doesn’t mean we can’t have as much fun as we did when we were younger. If anything, thanks to the wonders of disposable income, maybe we can even have more fun.

The first instance of this was quite a few years ago, when all of the cousins were back. I picked up a One Direction poster in Penang, then brought it back as a present to my other Australian cousins. Being two guys, they were the most appropriate cousins to give it to (or least, depending on how you look at it, which is what made it so funny), and they were probably the only ones who would know who One Direction are in the first place, never mind appreciate a One Direction poster. I didn’t expect they would do anything with it, and I think they ended up putting it in the bin, but their reactions were absolutely worth whatever minuscule amount I paid for the poster.

With a distinct lack of cousins this time around, I bought presents for my cousin’s children. They’re both boys, 7 and 3, and it’s been so long since I was last back that I hadn’t met one, and the other was just a two-year old the last time I was around.

It turns out buying toys for kids is hard. Not only do you have to consider the kind of things they’re into, the toy ideally doesn’t have batteries or require power, and can be played with multiple times. For bonus points, the toy might even be mildly educational or maybe triggers some kind of curiosity on their behalf, instead of just something for them to do when they can’t watch YouTube. I went to the same Toy World three times and half a dozen other stores before I could decide on something that was going to be a) fun, b) could be played with multiple times, and c) wasn’t going to cause their parents huge amounts of grief by being messy, too noisy, or need their help to be played with.

I ended up choosing this magnetic-ball racetrack thing you had to build out of plastic parts that snapped together, as well as a kid’s pogo-stick thing that made squeaky noises when you jumped on it.

I kind-of did a little experiment with Diet Coke and mentos as well, to show the kids something that they might not have seen before. For some reason, Diet Coke was impossible to find, and as it turns out, the Diet Coke and mentos thing doesn’t work very well with Coke zero sugar. By the time I wanted to try again with the Pepsi no sugar that I found that included the artificial sweetener aspartame found in Diet Coke, someone had stolen it. Clearly, they thought Pepsi was OK in lieu of Coke.

But as much fun as all those were, I wish we could have hung out more. Like we did when we were kids, when we all had zero responsibilities. Do you remember that time we stayed up all night talking over a very slow game of mahjong? I miss those days, when there weren’t kids to feed and shower and tuck into bed. Or kids that threw tantrums because they couldn’t stay up late and watch movies with the adults. I loved the one time that I went out with your siblings to get late night McDonald’s, but I wish we could have done that together. If not to get McDonalds per se, but to give us another chance to talk, to catch up.

But we all have to play the cards we’re dealt, right? When we grow up, we all have to make decisions about what we want to do with our lives, the kind of people we want to be. No one is unique in this respect.

So I think the answer to the question “are we old?” is no, absolutely not. We’re not old. We still sit on the kids table when we go out to dinner with our parents. Age is subjective anyway, and I think we still have a long way to go before I even begin to think of us as old.

We just need to make the most of the time we have now.

You know, before we get old.

I know what you’re thinking. Another birthday post? In such close temporal proximity to the previous one? But yes, it’s true. And now we’re all caught up.

Thirty One

A screenshot showing a level 31 character in Genshin Impact

A few years ago, I asked myself some hard questions:

As if 2020 wasn’t already hard enough, I asked myself some tough questions. How do I become a person that I’m proud to be? How do I stop being jealous, obsessive, or so judgemental? How do I become a loving husband and dedicated father, should I ever find myself in that position? Is there a book for that? Some Medium post I can read? How do I know what I want out of life? Can I watch some inspirational YouTube video and instantly get all the answers?

I’ve been thinking about it a little more ever since I wrote that, and I think I, instinctively, already know the answers to most of these questions.

I’m already someone I’m proud to be. Not perfect, by any stretch of the imagination, but no one is. I’m a flawed human being, just like everyone else I know. While I find it difficult to admit my flaws to someone I’m trying to impress, I need to realise that someone else’s validation won’t necessarily make me feel better about myself, either. I get that honesty is a thing, and that refreshing honesty is a thing as well, but maybe there’s something to be said for not admitting my flaws and just, you know, quietly working on them.

I stop being jealous by finding ways to be content with what I already have. By recognising that other people have differing circumstances, I can either change my own circumstances to match, or learn to live with the differences and accept that no matter how much I want them to be the same, differences are what set us apart. Variety is the spice of life, after all.

I stop being obsessive by learning to let go of the things, ideas, and concepts — and yes, admittedly, people — that I obsess over.

I stop being so judgemental by telling myself that there’s no need for me to judge others by what they do or say, because at the end of the day, it’s none of my business, and unless it’s somehow directly impacting me, I don’t need to care. Which is great, you know, one less thing I have to care about, in terms of the dozens of things I have to care about now that I’m an adult and everything.

As for the dedicated father and loving husband part, no one is born with those skills, so I’m sure I’ll be able to figure out some semblance of them as I go along. Hopefully. With any luck.

I know what you’re thinking. Another birthday post? In such close temporal proximity to the previous one? But yes, it’s true. This one is shorter because I want to do a little catch up, but sometimes short and sweet is the way to go.

Thirty

A glass of milo peng

I’ve done it. After thirty one years on this big blue ball they call Earth, I have finally cracked the secret to making the most delicious drink of all time: Milo peng.

Now at this point, I realise that some of you reading this will have no idea what I’m talking about, so let me explain. Milo peng is a drink. As its name implies, Milo is a key ingredient, sure, but that’s about all that it shares with the Milo made with milk you’d normally have at home, or anything like the warm Milo that your parents might have made for you when you were young. Milo peng has a particular flavour to it that belies a simple combination of Milo and milk, and for the longest time, I wondered what the recipe was to make a staple of Malaysian/Singaporean culture.

If you’re wondering why you’ve never heard of this magical drink before, it’s because you can’t buy it in Australia. No cafe, corner shop, supermarket, or Asian grocery that I’ve been to, anywhere in Australia, has sold it. Trust me, I’ve looked. You might be able to get it at certain Asian restaurants here, but if you want the real deal, you have to go overseas, to Malaysia, Singapore, or perhaps a few other south-east Asian countries. There you’ll find it everywhere, but most likely at hawker stores, food courts, and most Asian restaurants. A good rule of thumb is that if the place has air con, you probably won’t be able to order it. There are, of course, exceptions to this rule, most notable of which is probably Old Town.

Milo peng is such a staple of my Malaysia trips that as far as I’m concerned, it’s become synonymous with the country. Any Malaysia trip isn’t complete without having it at least once, and preferably you have it with every meal that you eat out. It even goes well with every meal!

For as long as I can remember, I’ve asked my parents about how to make it. Sometimes, when we arrived home from a trip to Malaysia, I would ask them, and they would typically be coy about it. Either they didn’t know, or they weren’t 100% sure. My dad seemed to think that the key ingredient was condensed milk, but on the few occasions that we tried making it at home, it didn’t taste anything like the original. After a few years of this, we stopped trying altogether, and eventually, I stopped asking.

When I still lived at home, we’d go to Malaysia every two or three years. It was always nice seeing cousins I hadn’t seen in a while. The last time I went back was 2017, and thanks to this global pandemic we now find ourselves in, I haven’t been back since. With Milo peng cravings reaching stratospheric levels, I finally decided I would take matters into my own hands. If my parents didn’t know how to make it, surely the internet did?

As it turns out, the internet sort of does and doesn’t. I couldn’t find any definitive recipe or guide to making it, as least none that was in English. There were a few blurry-cam YouTube videos, but one was all I needed to know the ingredients; reason being I thought I’d be able to figure out their exact ratios myself.. As it turns out, my dad was right all along. While Milo is a key ingredient, condensed milk is the other one.

Milo peng:
Condensed milk
Milo
Hot water
Ice cubes

Fill your cup with roughly three quarters of ice cubes. In another cup, pour about two tablespoons of condensed milk, along with two to three heaped teaspoons of Milo. Add hot water to the condensed milk and Milo, and stir well. Once it has been mixed down, pour it over the cup with ice and serve.

My only wish is that I wish condensed milk was easier to work with. It’s awful stuff; sticky and non-viscous enough to be annoying. If you’re not careful you’ll easily have a huge mess to clean up, especially if you use the canned stuff. Luckily, the much better (and far less messier) alternative is the version that comes in a handy squeeze bottle. They’re supposed to be used for decorating cakes and whatnot, and you’ll need more squeeze bottles than if you purchased cans, but it’s worth it for not having to clean up afterwards. Squeeze the condensed milk into your second cup, add milo, add hot water, and stir.

I also wish it were easier to prepare and didn’t require the use of two cups. Yes, you could theoretically use one cup to mix the condensed milk and Milo, add the hot water, mix it all down, then add your ice cubes, but doing so requires you to be familiar with the quantities at play so you don’t end up with too much or too little milo peng. Plus, I’m convinced pouring your hot condensed milk and Milo mix over your ice cubes helps even out the temperature of the beverage, when compared to adding on the ice cubes after. The second method means its more likely that the bottom of the Milo peng is warmer than the top. Whether you prefer this kind of temperature differential in your Milo peng is up to you; I am impartial to it and enjoy both variants equally, but for temperature consistency the first pour-over method is best.

Drink and enjoy!

By the time you read this I’ll hopefully had many more real Milo pengs of my own, on account of being in Malaysia. But thanks to the magic of post scheduling, I didn’t add a “stories from the road” prefix to this particular post, in the hopes that there would be other stories I could write and post about. We’ll see.

Yes, I know we’re missing a few years. Time is a fickle thing in a global pandemic, becoming both stretched in some instances, and compressed in others. Before you know it, two years has passed in the blink of an eye, and with it, any chance of posting anything around my usual birthday. We’ll make up the years, I’m sure.

A tale of two ratcheting screwdrivers

Two ratcheting screwdrivers

At its peak, the Australian Apple Premium Reseller known as Next Byte had more than 20 stores around the country, and I spent most of my earliest possible employment years at just one: Next Byte Hobart.

Today, the Apple landscape in Australia is a lot different to what it was over a decade ago. Thanks mostly to the iPhone, Apple is the largest company in the world. Apple owned-and-operated retail locations don’t so much compete with general electronics retailers as much as they offer an experience of their own. But as any reseller will tell you, slim profits on Apple products means it’s extremely difficult, if not outright impossible, to match Apple when it comes to the unparalleled customer experience that Apple Retail can offer. Any third-party Apple presence is either small enough to fly under the radar, or niche enough to carve out a market of their own. For the rest of us, Apple retail stores in every capital city CBD besides Melbourne, Darwin, and Hobart means out in-person sales and service needs are fulfilled, with any gaps covered by Apple’s online store and mail-in repair programs.

I have plenty of stories from my time at Next Byte. Maybe one day I’ll even write about a few of them, once I’m a little more comfortable the statute of limitations has passed. The one I’m telling you about today is about a really nice screwdriver I used to use, but also about some really nice screwdrivers I now own.

When I was doing iPhone repairs at my first place of employment, Apple mandated using a torque-limited, ESD-safe screwdriver on iPhone screws. I think this Wera 1460 ESD Kraftform Micro was the exact one that we used. It was a really nice screwdriver because it made it impossible to over-tighten the screws used on the iPhones, thus preventing any tool-based damage to the devices, but my managers at the time took every opportunity to remind me how expensive it was if, for whatever reason, it needed to be replaced. Which was fair enough, Apple repair margins were slim enough without having to pay three figures for tools, but it meant that while I wanted one, I could never justify owning one for the handful of times I’d need to use it around the house.

Until now.

Just kidding! We’re talking about ratcheting screwdrivers, remember? That particular Wera torque-limited model wasn’t ratcheting, but I feel as though I would only own one (and the specific bit set that it comes with that can’t be used for any other non-Wera screwdriver) if I was getting serious about repairing devices, which I’m not. So the next best thing is a ratcheting screwdriver, which has more general use cases outside of device repair.

Because work has progressively slowed down as we get into the Christmas and New Year period, I’ve been watching a bunch of YouTube videos. And when you watch ANY tech-related YouTube, you inevitably get recommended the Linus Tech Tips channel. You know the one, all praise the algorithm. Which is fine, LTT videos are fine. They can even be great if you’re looking to build a PC, or see lots of sometimes very-interesting PCs get built. One thing I’ve been noticing is that they’ve been pimping their screwdriver for what seems like years now. And the crazy thing about how marketing works is that when you get repeatedly told about how great something is for long enough, you start thinking about how great it would be to have one of your own, even if you have no real use for it outside of a handful of times per year.

But the truth is I’ve wanted a ratcheting screwdriver for a while now.

Now, the question that you really need to answer about ratcheting screwdrivers is, what does it really give you that you can’t get from a good electric screwdriver, given that you’ll basically pay the same amount? And the answer is that, for the handful of times a year that you might actually use a screwdriver, you don’t have to worry about whether your screwdriver is charged, or worry about having to replace its batteries in however many years because the battery can no longer hold a charge and is borderline useless. Plus, by all accounts those handheld, pencil-shaped, battery-operated screwdrivers have such low torque anyway that they fall exactly into the chasm of suck between “might as well have used a manual screwdriver” and “might as well have used a proper cordless screwdriver”.

But a ratcheting screwdriver? When you’re working with computers, that can come in handy. Being able to use a screwdriver without having to remove and re-insert your bit into the screw, or take your hands off your screwdriver to reposition it, is actually super useful and comes in handy when screwing things in at awkward angles or when a little forwards pressure is needed.

But which one? Obviously, for any purveyor of LTT videos, the LTT screwdriver is the only choice. There’s only one problem: it’s $70 USD ($95 USD including shipping), which seems untenable in this economy. Even if it is undeniably good and purpose-built for working with computers, as you’d expect an LTT screwdriver to be.

So what did I buy instead? Two ratcheting screwdrivers, for less than what the price of what one LTT screwdriver would have set me back.

The TTI ratching screwdriver that I found at my local hardware store is pretty similar to the LTT one. Like the LTT screwdriver, there’s a knurled portion of the screwdriver shaft for when you need more precise rotation, and while it doesn’t have the fancy pop-up bit storage on the back-end, the end cap screws off to reveal a bit storage compartment. Although the 10 included bits are not mounted to the inside of the screwdriver, you can completely remove them and the clip they’re attached to if you prefer a lighter screwdriver. It’s even similarly balanced when the bits are stored in the rear compartment. But the TTI “only” comes with 10 bits instead of 12, and its included bits are less computer focused and more general use, so no hex or square bits. Instead, the TTI comes with Torx bits. The magnet seems strong enough, even if it’s not quite as strong as the LTT one. The TTI also has a satisfyingly loud, industrial-sounding ratcheting mechanism, and I picked it up because it seemed like the best option of the other ratcheting screwdrivers that they had available. Plus, it was comparatively a steal at $40 AUD — not the cheapest one there, but the it was better than the cheaper alternative.

The Wera 816 RA, on the other hand, was more of a luxury purchase at $66 AUD with no included bits. That’s not a huge deal, as I can either use an adapter to use some 4mm precision bits I already have from an older iFixit screwdriver kit, or use the bits that came with the TTI, or even choose to pick up another bit set entirely. But where the TTI is a fairly generic screwdriver, the Wera seems like some thought was put into its design. The handle is contoured, has grippy green rubber sections, and feels nice in the hand. The bit-holding mechanism is exactly the same as the one on the torque-limited ESD-safe screwdriver that I used for iPhone repairs, ensuring that there’s no way the bit is coming out when being used, and the ratcheting mechanism feels more precise and sounds more refined, more engineered, even if both screwdrivers have similar amounts of wobble and play in their mechanisms.

As for which one I prefer, I’m not sure. The Wera seems like it is better for more general PC usage, just because of how compact it is compared to the comparatively large TTI, while still being able to do some of the heavier duties like working on the exteriors of PC cases. But even the Wera is much larger and much heavier than the precision screwdrivers you can get from the likes of iFixit, which I prefer for using on tiny-scale electronics repairs like most consumer electronics, so maybe it really is just a case of using the best tool for the job.

Crazy, I know.

My New Year’s resolution: 5120×2880

Current setup, 2023 edition

My current setup, 2023 edition

Alternate title: you want to experience true level? Do you?1

I have successfully converted a late-2015 27-inch Retina iMac into a standalone 5K display. After umm-ing and ahh-ing about it for a few weeks while I debated whether I wanted to potentially irreversibly disassemble a perfectly working iMac, I removed all the intervals of the iMac and replaced them with a 5K driver board that I bought from AliExpress, turning the whole thing into the cheapest standalone 5K display money can buy. Not to mention the only one that you can get that you can drive using regular old DisplayPort, no Thunderbolt required.

Why? All for an extra 55 PPI compared to readily available and much cheaper 27-inch 4K displays? Well, there are two main reasons you’d want to use a 27-inch 5K display compared to a 27-inch 4K one. But first, we need some Retina backstory…

Apple cops a lot of flack for introducing marketing terms without concrete technical specifications to back them up, and perhaps the best example of this is the term “Retina”. The Retina display article on Wikipedia actually has a pretty good explainer if you’re interested in the origin of the term, as well as what the derived definition is, based on what was said about it when it was first introduced with the iPhone 4, the first-ever Retina-class device. Remember, no concrete technical specs means we have to infer based on what we’ve been told at Apple launch events, but it seems to work.

The term Retina has been somewhat diluted now. A handful of prefixes and suffixes have been added to it to denote other variations on the theme, but whatever the marketing connotation, part of Apple’s theory behind Retina-class displays is that any display has to have a certain pixel density at a certain viewing distance, until you can no longer see individual pixels on the display. Obviously this assumes you have perfect eyesight, but putting that aside for the moment, for phones, that PPI figure is typically a lot higher than laptop or desktop displays because you’re typically holding your phone a lot closer to your face. That, in turn, means you need higher pixel density before you can’t discern individual pixels; hence higher PPI.2

You can do the maths yourself using any freely-available calculator, and Wikipedia has the actual formula. If you do, you’ll realise that theoretically, any display can be Retina if you’re sitting far enough away. For example, a 27-inch display using a very typical resolution of 2560×1440 is technically Retina from 80cm away. But I don’t know that many people who use their desktop displays from that far away, so not only do we have to start sitting closer, we have to go deeper into the Retina rabbit hole.

For simplicity’s sake, Apple also considers Retina to be a perfect multiplier of “standard” display resolutions. If we can’t change viewing distance in the Retina formula, we can simply put more pixels into the same space. By turning one pixel into four, quadrupling the total number of pixels and keeping everything else the same, that creates a sharper interface at the same physical dimensions. Earlier iPhones used a simple “2x” formula, with two times the number of pixels in both dimensions being four times the number of total pixels, but modern iPhones use a 3x scale which is nine pixels for every one on the original iPhone. For desktop displays, that means either doubling 1920×1080 referred to as 1080p or Full HD to give us 3840×2160 (4K), or doubling 2560×1440 (1440p) to 5120×2880 (5K). Apple refers to this as “HiDPI” mode.

What this means for us is that you can absolutely use a 27-inch 4K display in HiDPI mode, it will just look like a 1080p display, with four physical pixels representing every one. Which bring us to our first problem. If typical 1080p displays are usually in the 20-24 inch range, using a 27-inch display that looks like 1080p is too much physical screen for how much virtual screen real estate you get. Everything looks too big, which is where the magic of display scaling comes in.

But now we’ve introduced a second issue! Yes, you can use a scaled resolution on your 27-inch 4K display. Instead of the “native” pixel-doubling that you would get by using 3840×2160 physical pixels to represent 1920×1080, you can change the resolution of your external display up to 5120×2880 virtual pixels (which corresponds to a native pixel-doubling of 2560×1440), but then downscaling it to fit on the real 3840×2160 pixels that your display has. Doing so works, and fixes our issue of everything being too big, but this comes with its own set of issues, as per Bjango:

However, display scaling comes with some significant caveats, including a blurrier picture, shimmering when scrolling, moiré patterns, worse GPU performance, and worse battery life if you’re using a laptop. Display scaling also undoes dithering, which can mean gradients aren’t as smooth. With those issues in mind, it’s far, far better to run macOS at the pixel density it was designed for.

Check out their pictures and GIFs at the link, and you’ll be able to see the difference. Some of those issues aren’t as significant as others, but the biggest one for most people who care about this sort of thing is how using a scaled resolution makes your whole display look less crisp.

Continue Reading →