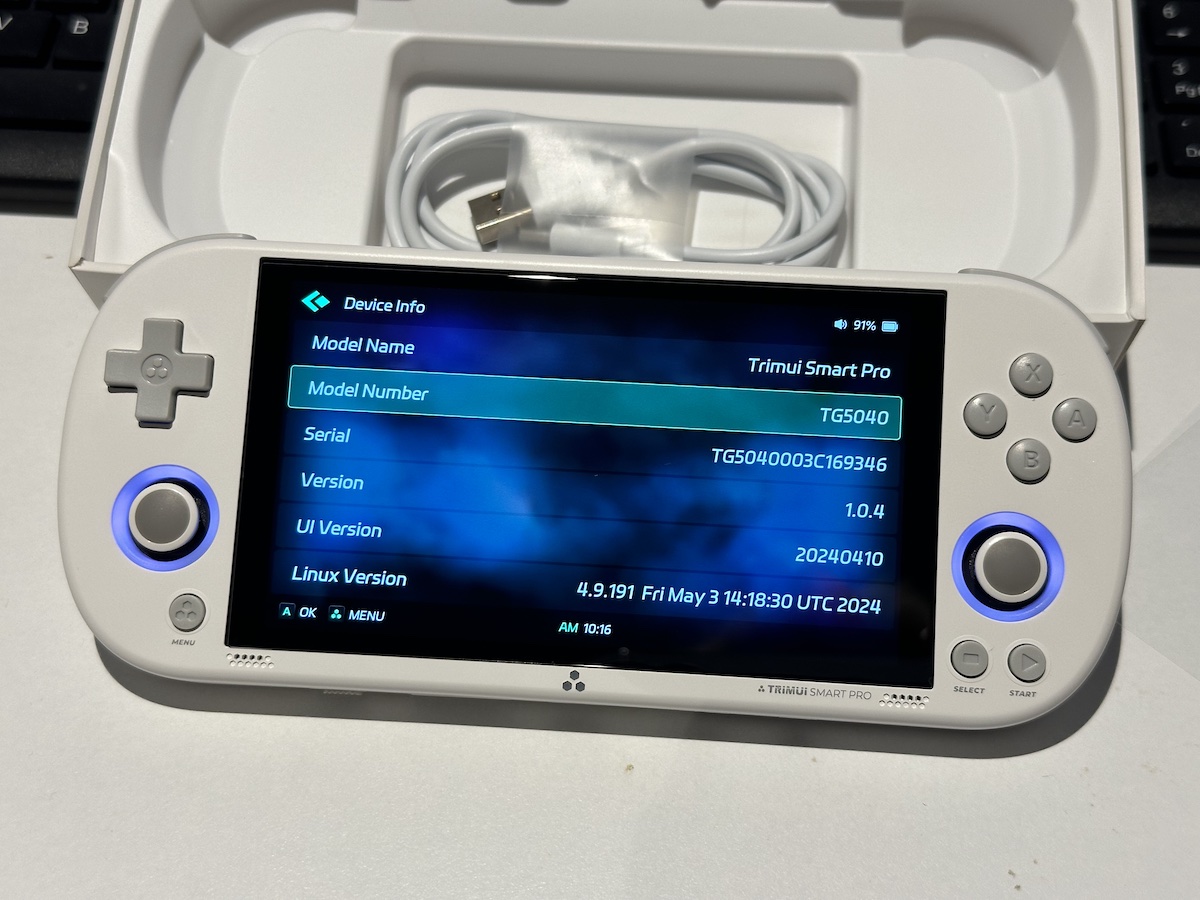
Fixing my Polaroid OneStep+ Camera

My Polaroid OneStep+ camera in white

At the start of the year, I noticed that my Polaroid OneStep+ camera had a problem: it stopped ejecting photos. Just when I wanted to take cute instant Polaroids of my cousins, I couldn’t, despite already shelling out for the Polaroid photos. At $4 per shot, with limited shelf-life and having been dragged all the way to Malaysia through several x-ray machines, I was a little upset.

This was kind of an issue. While I could take photos, they would never be developed or printed correctly. Most of the magic happens when the photos pass through the rollers, which spreads developing chemicals so your picture shows up within 10-15 minutes.

Polaroids are pretty simple cameras. They might even be simpler than most cameras. Like most cameras, there’s a lens that light travels through. From there it hits a mirror, which redirects the light directly onto the exposed film which sits at the top of the cartridge. From there the photo is ejected through the rollers and through the door at the front. 10-15 minutes later, your photo shows up. There’s no focusing mechanism on the lens, the small viewfinder on the body of the camera is entirely un-parallax corrected, and the only modern conveniences are a flash to give your photo that classic Polaroid look, with sharp shadows cast on the background. Oh, and there’s a second lens too, if you want to do close up shots, although the focusing range they advertise overlaps so much that you might as well use the other lens most of the time, unless you’re really close to your subject.

If my photos ejected more than one at a time, or nothing was being ejected at all, then that might have been an issue I could have performed some troubleshooting on and maybe even fixed. But no, my issue was that while the initial “dark slide” of a new photo pack would eject fine, any subsequent ejects just wouldn’t fire. The rollers would do their thing and spin, but no photo came out.

At the time, some frantic Googling of the issue suggested that it was an issue with the pick arm. The internet claimed that it was possible that the pick arm could have been bent, and wasn’t picking up photos as it should have been. This didn’t make that much sense given that the dark slide was being ejected OK, but no subsequent photos were, but anything was worth a shot. I fiddled with the pick arm a bit, but it didn’t seem to help.

My next smart idea was to take advantage of the fact that the dark slide ejected fine and take a photo, open the cartridge door, make the camera think that I had removed the cartridge and inserted a new one, then close the cartridge door and force it to eject the first photo in the hopes that it would develop the photo correctly when it did so. This relied on two things to work how I wanted it to. The first assumed I could do all this without exposing the first top-most photo with my undeveloped shot to as little light as possible, while the second condition relied on the assumption that the first dark slide ejection worked the same as any other normal photo ejection, and that “real” photo ejections didn’t have some different electrical process that added some magic into the process specifically for photos, as opposed to the plain-cardboard dark slide. Fairly big assumptions, but at that point, it was worth a shot. Pun not intended.

This didn’t work either, but my memory is a little hazy as to why. I knew beforehand that taking a shot, then going to some dark place to unload and reload the cartridge, before being able to take another shot (all while exposing the shot to as little light as possible), was going to be incredibly awkward, but even then I don’t think that was the main issue. I think it might have had something to do with the dark slide not ejecting the whole way, which wasn’t necessarily a problem per se as that might have just been how the Polaroid worked, but I can’t really remember if that’s the case or not, seeing as I’ve only used it a handful of times previously.

Either way, what I wanted wasn’t really workable, so I gave up on the whole thing. Cute Polaroids with cousins would have to happen some other time.

Continue Reading →

Stories from the road: The Charmander Expedition

The Charmander B-Side Label sticker

Ugh. This Pokémon store didn’t have it either. Not only had I been to three different Pokémon stores in three cities by that point, but none of them had the Charmander sticker I was looking for. The tiny Pokémon Centre at Tokyo Station in character street didn’t carry stickers at all, and this one, the Pokémon DX in Tokyo, had the stickers but was out of stock of more than just the Charmander I was after.

I had first come across B-Side Label stickers at the Fuji-Q gift shop, but it wasn’t until I stumbled one of their brick-and-mortar stores in Kyoto that I realised that they were a real thing of their own and not just some collaboration between a sticker company and some big names like Nintendo/Game Freak and whatever anime you care to name.

Being somewhat of a sticker connoisseur myself, I was instantly drawn to their cool designs and incredible range. They covered basically every popular anime, and plenty of other subcultures I didn’t recognise. If you managed to go to an actual B-Side Label store, they had entire books of their range, or you could browse their entire collection on an iPad.

I had seen Pokémon stickers previously at other Pokémon centres, of course, but it wasn’t until the Osaka Pokémon centre that I decided I wanted a small set. But which ones? That was obvious. Pikachu, of course, plus the starter Pokémon and legendary birds from the original 151. While Gen I wasn’t technically the generation I grew up with, it was close enough and far more recognisable, not to mention far more iconic. Anything after the first 251 Pokémon might as well not exist.

I managed to pick up Pikachu, the original starters, and the legendary birds at the Osaka Pokémon Centre, minus a Charmander. But that didn’t matter, because I knew I had an extra couple of days in Tokyo, and surely, surely, one of those Pokémon centres would have a Charmander, right?

Wrong. So wrong.

Now that I had been to most of the Pokémon centres in Tokyo, it was time to go to plan B: an actual B-Side Label store. There had been one in Osaka (where I got in trouble for taking a video in the store, even though there weren’t any signs saying it wasn’t allowed), but the B-Side Label store in Tokyo was a little out of the way, and involved two short train rides and a 2.2km walk. By that point it was getting late, maybe 8 or 9pm, and I had probably already done 20,000 steps at Tokyo Disneysea and was beginning to feel it, but I knew that this would be the last chance I had to find a Charmander sticker to complete my set.

All I can remember is how I felt a wave of relief when the Harajuku B-Side Label store had the Charmander sticker I wanted. Missing out on the sticker wouldn’t have been the end of the world, and would have given me yet another reason to go back to Japan (or just buy it online, if that was even possible), but otherwise I would have had a unique sticker collection.

My Pokémon stickers would have been missing a Charmander, but I had a good reason for when someone asked about why I was missing Charmander.

Well, I would have if the Charmander Expedition wasn’t such a rousing success.

Apple Watch Bands, Ranked

The 2023 Pride Edition Apple Watch band outside the Apple Store

This is my ranking of all the Apple Watch bands you can currently buy:

  1. Sport Band/Nike Sport Band
  2. Milanese Loop
  3. Woven Nylon
  4. Silver Link Bracelet
  5. Trail Loop

I have a problem, and it involves Apple Watch bands.

I now have third-party versions of most kinds of the Apple-branded (i.e. not Hermès) Apple Watch bands. It’s not that the genuine Apple ones are bad, but for the few genuine bands I have compared to their third-party equivalents, there’s just not enough of a quality difference to justify the difference in cost. Especially when we’re talking about the liquid silicone rubber sport bands, or the nylon sport loops, no matter if they’re called fluoroelastomer or whatever other fancy term Apple uses.

Apple’s first-party watch bands are nice and all, and their sport bands have a better-feeling silicone/rubber texture than the third-party ones, but it quickly becomes cost-prohibitive to have any more than one or two colours, especially seeing you can only wear one at any given moment in time. Multiply that by the multitude of band styles, seasonal colour variations, and special editions, and third-party fakes quickly start to become the only way you can stay ahead of the watch band game.

Genuine vs third-party differences aside, there’s now so many different types of Apple Watch bands that it’s hard to know what bands you might like, short of buying them all and trying them, or going to your local Apple Store and trying them on in-store.

But by the same token, because there’s so many, if you have certain preferences for materials, looks, or both, you can choose a watch band that suits your own personal tastes.

If I had to pick watch bands based on personal preference, it would be something like so:

  1. Milanese Loop
    The Apple Watch band I wear most of the time is the Milanese Loop. Because I have the stainless steel Apple Watch, the Milanese Loop matches the polished, shiny look of the stainless steel really nicely. It uses a magnet to hold the strap against the band, which is always cool, and it’s both understated enough to not be too flashy on first glance, as well as being slightly fancy if you take a closer look. It’s only real downsides are the fact that it isn’t casual as something like the Sport Bands, and it’s heavy — not as heavy as the Link Bracelet, but definitely heavier than sport bands or nylon watch bands.

  2. Sport Band/Nike Sport Band
    It’s hard to go past the venerable Sport Band and the Nike Sport Band, mostly due to the fact that they’re the best watch band for most people. They’re available in a huge range of colours, and while they use the simplest pin-and-tuck fitting system that might not provide the fitting granularity or fine-adjustment capability of something like the Sport Loops and Nike Sport Loops, they’re casual but smart, and light but durable. The best thing about the Sport Bands is that they’re extremely hard to fault, which is probably why they’re regarded as one of the best Apple Watch bands of all time.

  3. Woven Nylon
    The Woven Nylon watch bands, despite no longer being available from Apple new, are probably the most traditional Watch bands you could have bought. Short of a real leather watch band, the Woven Nylon were light and had a classic pin and buckle style arrangement that was like the pin and loop design of the Sport Bands, only less modern. But still, the Woven Nylons look great with basically any outfit, and while they aren’t as formal or flashy as the Milanese or the Link Bracelet, they still represent good value both in terms of practicality and monetarily.

  4. Link Bracelet
    The Link Bracelet is the kind of watch band you’d expect to wear with actual high-end watches. With the exception of the higher-priced space black Link Bracelet (which is at least partially justified by the special DLC coating that makes it very, very scratch resistant), you would wear a Link Bracelet with your Apple Watch if you were attending some kind of formal event, for example, and still wanted a high-tech watch instead of a traditional Rolex or similar. By that same token, I probably wouldn’t recommend it as a daily driver.

  5. Trail Loop
    I am generally against Velcro watch straps. They might seem like a simple, easy option that’s suitable for everyone, but this belies the fact that they’re more utilitarian than I’d like. There are two major downsides to the Sport Loops and Nike Sport Loops that Apple sells. Firstly, they feature the loops on both sides of the watch band, which puts loops in contact with your skin, not the watch band itself, and worse still, show the loops on the outside of the watch band which looks awful on your wrist. Secondly, the sound velcro makes when you’re taking it off is always jarring, and you’ll hear it every day when you take your watch off to charge. That being said, I begrudgingly acknowledge their overall place in the hierarchy of Apple Watch bands thanks to the sheer number of Sport Loops and Nike Sport Loops. So if you absolutely must wear a Velcro band, the Trail Loop is the best of the worst purely for the reason it has the loops only on one side of the Watch band. While the colour selection isn’t great, it is one of Apple’s newest Watch bands, so that’s kind of expected.

Stories from the road: Uncomfortable

The entrance to Super Nintendo World at Universal Studios Japan

Of all the places in the world that I’ve been to so far, none have made me feel as uncomfortable as Japan.

This can be mostly attributed to the language barrier. Japan, despite being a huge tourist destination, has a unique combination amongst Asian countries of having a generally introverted populace1 with scarce English skills, and looking back on it now, it was both of these factors that made me feel so uncomfortable while I was there.

Of the half-dozen Asian countries I’ve been to, I’ve been fine being an Asian tourist that blends into the locals, with passable Chinese language skills. Even if I couldn’t understand every thing that was being said, I could at least understand some things. Not having that ability with Japanese, in Japan, made me extremely uncomfortable.

It made me realise how I’ve taken my meagre language skills for granted. I’m barely conversational in Mandarin, but even that has always felt like enough, for the places that I’ve been to.

But in Japan, having people speak Japanese to me and not understanding a word of it, is uncomfortable as hell.

It made me uncomfortable speaking English back to people who spoke Japanese, like I was operating under the assumption that they understood and spoke English. When they didn’t, it made me uncomfortable pointing at things on menus to communicate what I wanted, like I was some kind of mute toddler. It made me uncomfortable not knowing if the handful of Japanese phrases I learned were being pronounced correctly, or whether they understood what I was saying when I said them. It made me uncomfortable speaking Japanese in the first place, because then they might assume I knew Japanese, and keep speaking Japanese to me. It made me uncomfortable playing the part of the ignorant foreigner, all while some Japanese assumed I was also from Japan and could speak Japanese.

For one of the few times in my life, I was truly outside of my comfort zone. And it was great!

Being outside my comfort zone meant that I was finally able to experience a culture and language other than my own Chinese background. I’ve travelled enough with my parents and relatives to enough countries to know that I wasn’t getting the full experience when overseas, but doing things on your own is a different thing entirely. Despite how uncomfortable I was conversing with locals, I was able to navigate around Japan perfectly fine on my own, with a little help from Google Maps and the English signage at train stations. I did and saw about 85% of the things I had put on my list to do and see, with a few things left over in case I ever decide to go back.

Continue Reading →

Character

Brisbane Treasury Casino and Hotel, as viewed from Reddacliff Place

Cameras in phones are probably a little too good these days. I can pull out my iPhone, snap a pic of whatever I’m looking at, and know that every detail will be captured, timestamped, and geo-tagged. I’ll even get a few seconds of video to go along with my photo, all in less time than I spent thinking about taking the photo in the first place.

Film, by comparison, has none of those benefits.

With film, I have to think about what I’m taking a photo of. Not because I’m worried about using one of my 36 exposures on whatever roll of film I’m using — although I am limited by the total number of exposures I have available to me at any one time, that typically isn’t a concern — but because it forces me to think about composition and framing, even focus, more than digital does. Digital might have ever-increasing megapixel counts which make cropping an easy way out if you didn’t get your framing right the first time, but there’s no such advantage with film, where your negatives will betray your imperfect framing every time.

When you’ve shot with film for a while, and particularly when you put the same speed and type of film through your camera dozens of times, you notice that your photos get a certain look about them that you don’t see with photos from your iPhone. It’s film grain, sure, but it’s more than that. It’s the way certain colours are more noticeable than others, the limited dymanic range of film, and the contrast between the light and dark parts of the image that work together to make the whole thing the slice of life that you captured at the time. Some parts might be out of focus, intentionally or otherwise, but all of it contributes to something that digital photos just don’t have these days.

Character.

When I’m taking a photo, if I want everything to be in focus, if I want every pixel to be perfect, even if I want everything to be HDR’d to the n-th degree, then I’ll pull out my iPhone and snap away. I know that when I take photos with my phone, the photos I take are as good as it gets, at least within the limits of camera technology that we have in phones these days, short of spending thousands on a pro-level camera and lens. And obviously, if I want to take video, I’ll pull out my iPhone. But if I want to capture an interesting perspective, or convey what the scene looks like to me, as opposed to what it actually is, that’s a job for my film camera, and an exposure of Ektar 100. If I want the sky to be overexposed, if I want shadows and highlights in equal measure, if I want colours to pop without being overbearing, then film is the only choice.

Obviously, there are a plethora of advantages to digital that film just doesn’t have, otherwise we’d all still be shooting film. But there have been so many advances in computational photography that it has pushed digital photography to the point where it’s more or less boring — perfect, life-like photos every time? Who wants that? Perfect photos might be all well and good for most people, most of the time. But the other times, I want my photos to have some imperfections.

I want my photos to have character.

Which makes film the perfect medium to be shooting on. And if I’m shooting film, there’s nothing more fun that shooting with a film rangefinder.

Selective photo permissions in iOS sucks, actually

A couple of years ago, Apple introduced the idea of selective Photos access. The idea was so that if you let an app have access to specific photos, then the app couldn’t do something like steal all your photo metadata straight out of your camera roll, including location. Great for apps that you didn’t necessarily trust to abuse that access, given that there’s was no way for you to tell if an app had collected all the metadata from all your photos and uploaded it into a database somewhere.

Apple’s solution, introduced with iOS 14 in 2020, was to allow you to select which photos an app has access to, which sounds great in theory, but has become a bit of a usability nightmare.

The problem is that by only selectively allowing an app to access your photos, you’re effectively choosing between two, kinda sucky options.

If you selectively allow access to photos, it means that every time you want to share a new photo to the app, you have to take the photo (using whatever camera app you want, whether that’s the stock camera or something like Halide), jump into the app, hope it has a deep link to the Settings page that allows you to change which photos it has access to (not all apps do, and the implementation to select photos can differ between apps), select the new photos that you just took, and then finally send them using the app. This three-step dance of taking, selecting, and sending happens every single time you want to send a photo using an app that only has selective access to your photos, which adds a huge amount of friction to a process that should be as few steps as possible.

But what’s the alternative?

The other way you can get around this taking/selecting/sending process is by using whatever app you’re sending the photos with, to take the photos with in the first place. Most apps have an integrated camera option that allows you to take a new photo right from within the app, then send that directly. And while this is a much simpler, more streamlined process than the snap-select-send dance, it comes with its own caveats. Firstly, there’s no guarantee that these photos taken directly within apps will be saved to your camera roll by default. While some apps offer to save taken photos to your camera roll automatically, apps like Snapchat make you tap a button before the photo you’ve taken is saved to your camera roll. But when you do, these photos taken from within apps seem to miss out on some normal photo metadata, like camera/lens info, exposure, focal length, location, and they don’t seem to be able to be Live Photos or be recorded in different image formats, either.

Screenshot of two comparison photos, taken using the Steam Chat app on the left, and using the stock camera on the right.

Note differences in metadata between these two photos. Photo on the right taken using the Steam Chat app on the left, and using the stock camera on the right.

Without looking too closely at the technical details, photos taken within apps might also be missing out on some of the technical features afforded to the stock camera app, like being able to automatically switch to the ultra wide lens for the macro mode on recent Pro-model iPhones, for example, nor do you seem to get access to the camera modes and effects of the stock camera app. This means your photos when taken using apps aren’t necessarily going to be the same as ones when you take them using the stock camera app. All of this is still probably fine, if all you’re doing is taking photos for the purposes of sharing to others, but you might miss that data months or years later. There does seem to be exceptions to this, as clearly third party camera apps like Halide can capture in different formats, but I think Live Photos are a stock camera app exclusive.

So when you want to share a photo to an app that doesn’t have access to your entire location history from all the photos in your camera roll, you can either:
– do a snap-select-send dance every time you want to send a new photo using that app, keeping your photo metadata intact and ensuring the best possible photos
– take and send the photo directly from within the app, which is a much more simplified process, but results in photos with no metadata and other features that you might want later, like Live Photos, and maybe even things like depth information.

And obviously, this is only for photos. For screenshots, the situation is even worse, and you have to do the snap-select-send dance every time.

What’s the fix?

Unless I’m overlooking something here, isn’t it as simple as letting apps only access photos taken in the past one or two hours? If you’re sending a photo that you just took, it seems unlikely that you would be doing it more than say two hours after it was taken, and while a higher number would give more leeway for this, I’d be concerned about an app having a rolling 12 or 24 hour access to your photos, because then we’d just end up with the same problem that we had originally if apps have access to all your photos, but one or two hours hopefully means that apps you haven’t recently used, won’t be able to take a rolling 1-2 hour peek at your photos.

Maybe the better solution is to prevent apps from having access to photos metadata in the first place. Then none of this would be an issue, and we could go back to the time when apps had access to all photos, all the time. Selective photos metadata might not be technically possible, but that would be the ideal.