Tag Archives: display

My New Year’s resolution: 5120×2880

Current setup, 2023 edition

My current setup, 2023 edition

Alternate title: you want to experience true level? Do you?1

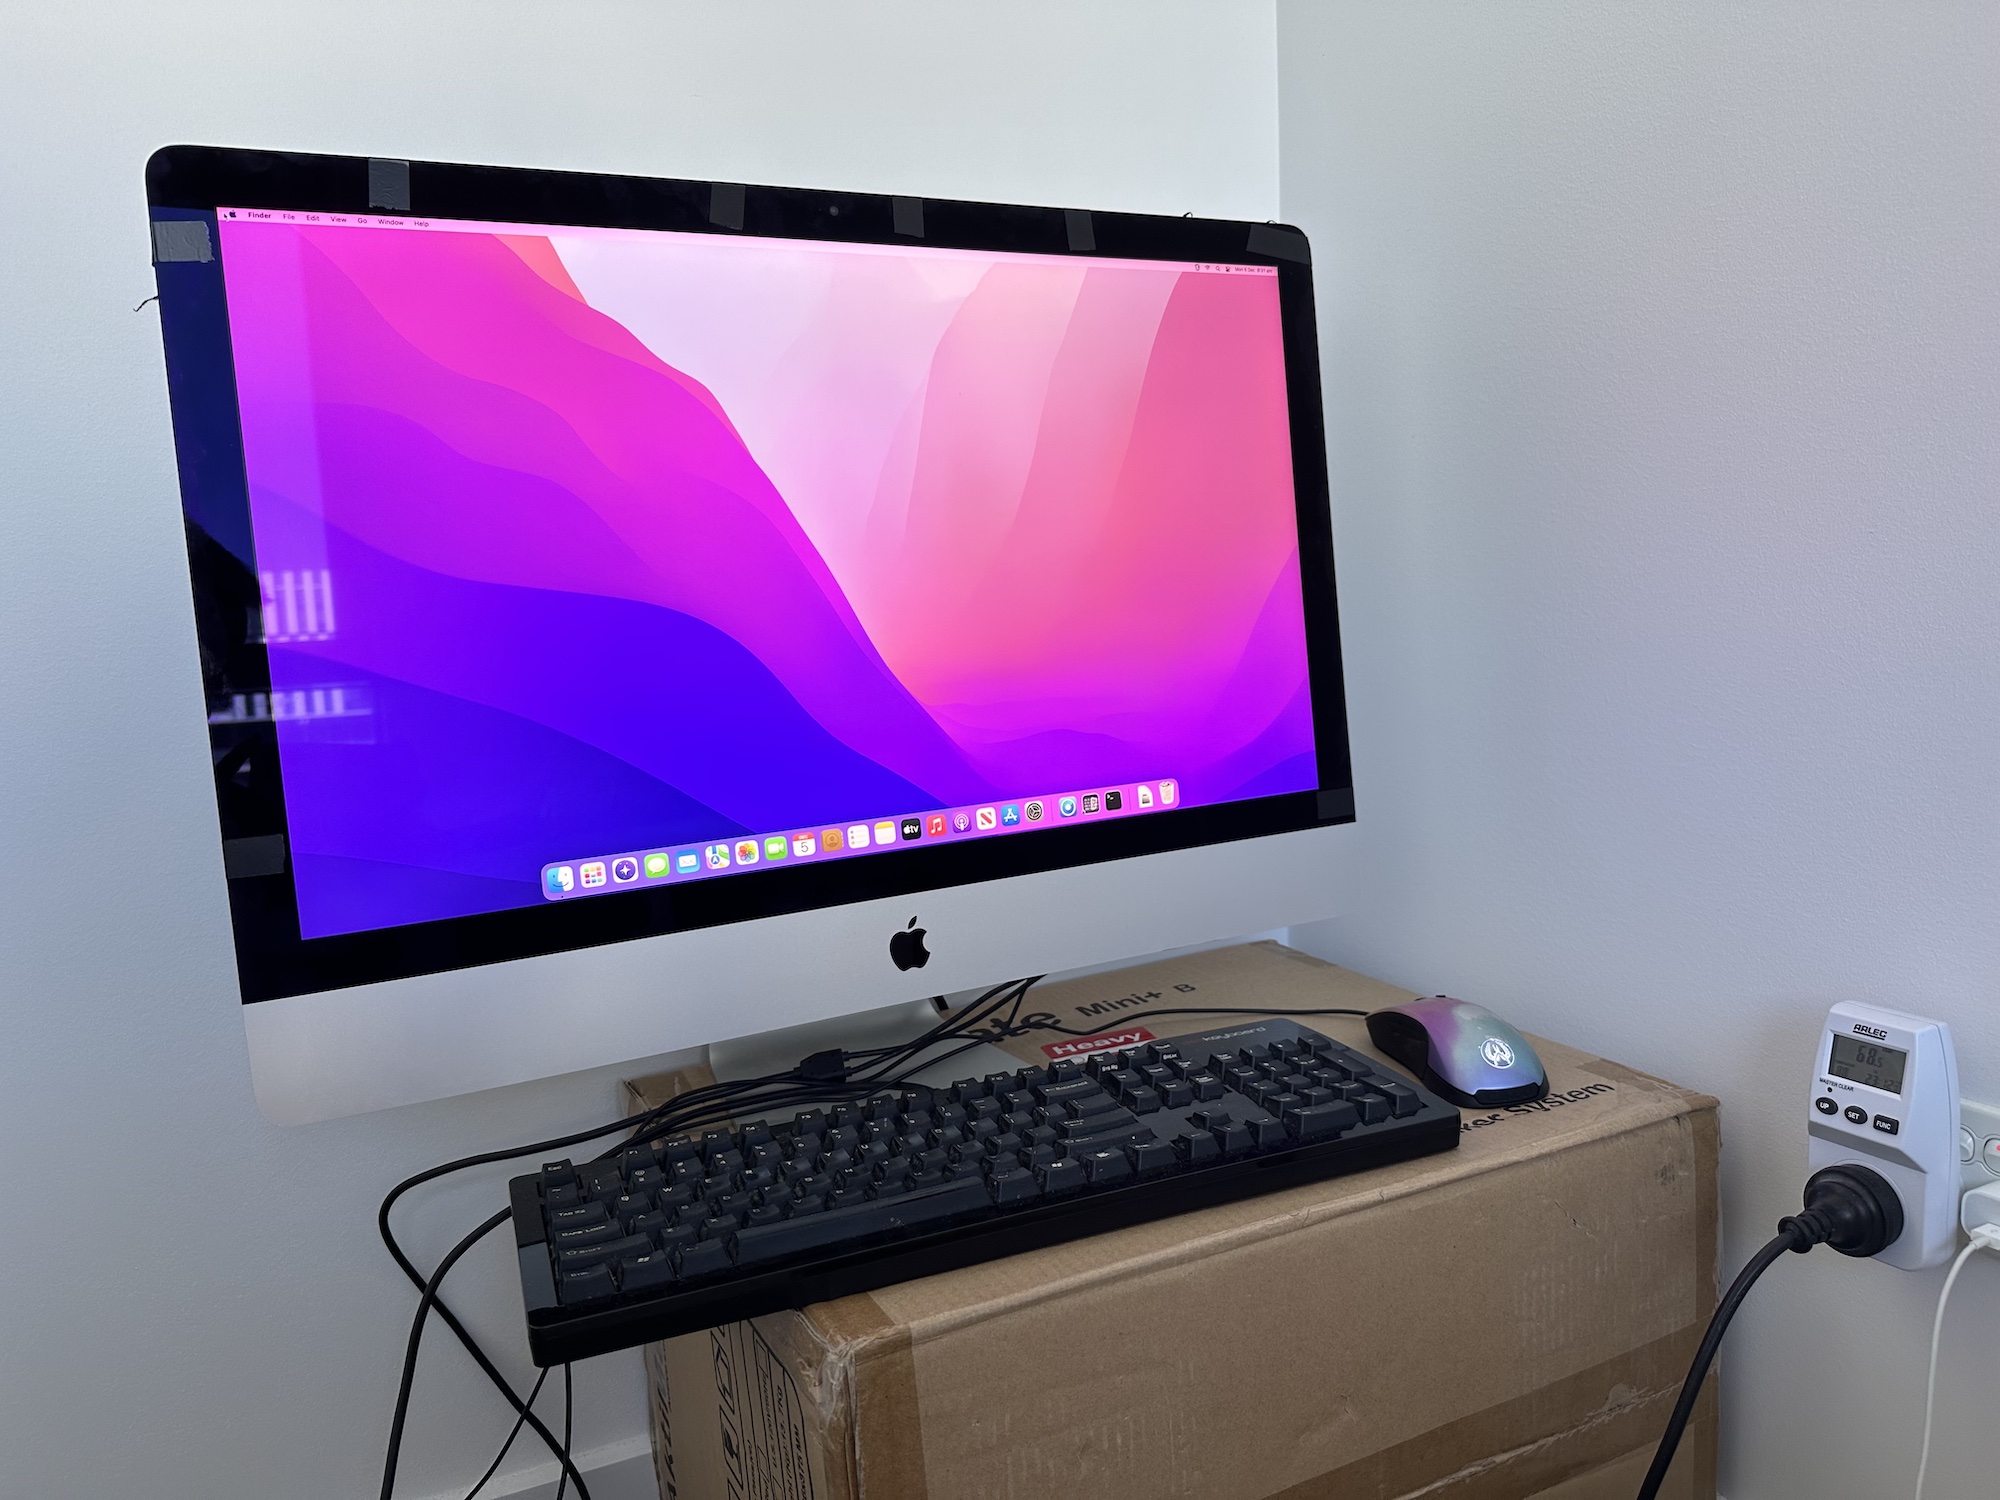
I have successfully converted a late-2015 27-inch Retina iMac into a standalone 5K display. After umm-ing and ahh-ing about it for a few weeks while I debated whether I wanted to potentially irreversibly disassemble a perfectly working iMac, I removed all the intervals of the iMac and replaced them with a 5K driver board that I bought from AliExpress, turning the whole thing into the cheapest standalone 5K display money can buy. Not to mention the only one that you can get that you can drive using regular old DisplayPort, no Thunderbolt required.

Why? All for an extra 55 PPI compared to readily available and much cheaper 27-inch 4K displays? Well, there are two main reasons you’d want to use a 27-inch 5K display compared to a 27-inch 4K one. But first, we need some Retina backstory…

Apple cops a lot of flack for introducing marketing terms without concrete technical specifications to back them up, and perhaps the best example of this is the term “Retina”. The Retina display article on Wikipedia actually has a pretty good explainer if you’re interested in the origin of the term, as well as what the derived definition is, based on what was said about it when it was first introduced with the iPhone 4, the first-ever Retina-class device. Remember, no concrete technical specs means we have to infer based on what we’ve been told at Apple launch events, but it seems to work.

The term Retina has been somewhat diluted now. A handful of prefixes and suffixes have been added to it to denote other variations on the theme, but whatever the marketing connotation, part of Apple’s theory behind Retina-class displays is that any display has to have a certain pixel density at a certain viewing distance, until you can no longer see individual pixels on the display. Obviously this assumes you have perfect eyesight, but putting that aside for the moment, for phones, that PPI figure is typically a lot higher than laptop or desktop displays because you’re typically holding your phone a lot closer to your face. That, in turn, means you need higher pixel density before you can’t discern individual pixels; hence higher PPI.2

You can do the maths yourself using any freely-available calculator, and Wikipedia has the actual formula. If you do, you’ll realise that theoretically, any display can be Retina if you’re sitting far enough away. For example, a 27-inch display using a very typical resolution of 2560×1440 is technically Retina from 80cm away. But I don’t know that many people who use their desktop displays from that far away, so not only do we have to start sitting closer, we have to go deeper into the Retina rabbit hole.

For simplicity’s sake, Apple also considers Retina to be a perfect multiplier of “standard” display resolutions. If we can’t change viewing distance in the Retina formula, we can simply put more pixels into the same space. By turning one pixel into four, quadrupling the total number of pixels and keeping everything else the same, that creates a sharper interface at the same physical dimensions. Earlier iPhones used a simple “2x” formula, with two times the number of pixels in both dimensions being four times the number of total pixels, but modern iPhones use a 3x scale which is nine pixels for every one on the original iPhone. For desktop displays, that means either doubling 1920×1080 referred to as 1080p or Full HD to give us 3840×2160 (4K), or doubling 2560×1440 (1440p) to 5120×2880 (5K). Apple refers to this as “HiDPI” mode.

What this means for us is that you can absolutely use a 27-inch 4K display in HiDPI mode, it will just look like a 1080p display, with four physical pixels representing every one. Which bring us to our first problem. If typical 1080p displays are usually in the 20-24 inch range, using a 27-inch display that looks like 1080p is too much physical screen for how much virtual screen real estate you get. Everything looks too big, which is where the magic of display scaling comes in.

But now we’ve introduced a second issue! Yes, you can use a scaled resolution on your 27-inch 4K display. Instead of the “native” pixel-doubling that you would get by using 3840×2160 physical pixels to represent 1920×1080, you can change the resolution of your external display up to 5120×2880 virtual pixels (which corresponds to a native pixel-doubling of 2560×1440), but then downscaling it to fit on the real 3840×2160 pixels that your display has. Doing so works, and fixes our issue of everything being too big, but this comes with its own set of issues, as per Bjango:

However, display scaling comes with some significant caveats, including a blurrier picture, shimmering when scrolling, moiré patterns, worse GPU performance, and worse battery life if you’re using a laptop. Display scaling also undoes dithering, which can mean gradients aren’t as smooth. With those issues in mind, it’s far, far better to run macOS at the pixel density it was designed for.

Check out their pictures and GIFs at the link, and you’ll be able to see the difference. Some of those issues aren’t as significant as others, but the biggest one for most people who care about this sort of thing is how using a scaled resolution makes your whole display look less crisp.

Continue Reading →

Retina Displays, Part Three

An iMac with its screen attached with electrical tape

Yes, the screen is attached via electrical tape. Temporarily, because attaching it with adhesive is a one-time thing.

By some fortuitous mechanism that can only be described as “scoring something off the local computer forum” (close enough to be my own version of “scoring something for cheap off Craigslist”), I am now the proud owner of a late 2015 27-inch iMac. Yes, that’s right, the one with a 5K display. Now to be clear, there’s something wrong with this iMac, which is why I was able to get it for so cheap, but I figure if I can put a little work into it to get it working again, then that’s time well spent, in my books.

It’s a pretty decent-specced machine, too; an 4GHz quad-core Intel Core i7 (as it turns out, the same i7-6700K CPU that’s in my current gaming rig), maxed out with 32GB DDR3 RAM, and an AMD R9 M395 with 2GB VRAM. It’s in great condition, too. There are some very minor, superficial scratches on the display that you can only see if you’re looking for them when the screen is off, but otherwise no chips, dents, or scratches anywhere else on the screen or on the external aluminium enclosure.

The issue with this particular iMac was that its internal 3.5-inch hard drive was dead. These iMacs came standard with a Fusion Drive, which was Apple’s term for a SSD and HDD combo that was supposed to give you the best of both worlds in terms of speed and storage. This particular iMac had a 128GB SSD that still seemed to be working, but its hard drive was only good for making clicking sounds and being recognised as an unknown 4GB storage device, which I’m taking to mean it was one of those even weirder hard drives with built-in SSD caches, or something.

Installing the latest supported OS on the thing turned out to be a nightmare, even for someone who has had some experience with Macs. No matter what I did, macOS Monterey would get halfway installed before rebooting and restarting the install process. At first I thought this was some kind of reboot loop — an issue I also experienced with my own late 2013 MacBook Pro when attempting to install Catalina or Big Sur, I can’t remember which — but no matter how many times I tried, I couldn’t get Monterey to finish installing. Catalina, on the other hand, installed fine. I had issues getting Big Sur install media working, so for the time being, it was Catalina or nothing.

I suspected my Monterey install issues were related to the failed internal hard drive. That seemed to line up with the random kernel panics I was getting in Catalina, where it seemed like macOS would attempt to access the internal hard drive, realise it was dead, and then freak out and fall over when it didn’t know what to do. It seemed Catalina was as far as this thing was going. At least not without opening it up, disconnecting the hard drive, and then trying again… which is what I ended up doing about two weeks later, after some tools arrived for me to open it properly (and put it back together again).

See, my original plan for this machine was to turn it into a standalone 5K display. I had first heard of the idea via The Sizzle, a great tech newsletter by the founder of MacTalk. By pulling out all the internals of the iMac and replacing them with a relatively inexpensive — I’d hesitate to call it cheap, but it was definitely cheaper than buying a standalone 5K display — driver board you can buy from AliExpress, you can turn your 5K iMac into a standalone display that you can drive via regular old DisplayPort, which is great if you’re after none of the complexities that come with a Thunderbolt-driven 5K display1. A YouTuber probably wasn’t the first person to turn a 5K iMac into a standalone display, but they probably contributed to popularising the idea.

Like I mentioned in my other post on Retina-class displays, there are very few options if you want something other than the not-quite-Retina-class 4K at 27-inches, and none of them can be had for under $1800. With any luck, this iMac conversion will be a third of that. Not cheap — you could easily buy a great display for $600, even if it’s not quite 4K 144Hz, but 1440p 144+ Hz is easily doable — but much less expensive than what a new 5K display would set you back.

Continue Reading →

More (Retina) Display Thoughts

Dell U2711 beside a white MacBook

Simpler times. My setup from November 2010, featuring a Dell U2711 beside my white MacBook of the time.

If I’m honest, I was a little early to the 4K train. Had I known about the Retina-class displays that would be coming out not that long after I purchased my first, current, and only 4K display, I would probably have waited a year or two. That’s not saying I don’t love my Dell P2715Q — having a 4K, 60Hz, IPS display in late 2014 for under $1000 was a pretty sweet deal at the time — but had I known about the higher pixel density displays that were coming out, I might have waited. But predicting the future of technology is a fool’s game, and hindsight, as they say, is 20/20.

Retina-class displays are a mess. You can count the models you can currently buy new on one hand, and none of them come in under $1800. The introduction of Apple’s own Studio Display means there’s now exactly three models you can buy new today, making it an exclusive club indeed. LG’s UltraFine 5K, Apple’s own Pro Display XDR, the Apple Studio Display… and that’s it! There are a bunch of older models that you can’t find new today, but even at “peak Retina” a few years ago, there were never more than a handful of models available that came with roughly 220ppi. There are some that come close, like LG’s UltraFine 4K, but even then that costs over $1000 today, which would otherwise buy you a nice 4K high-frame rate IPS display (more on this in a sec).

Reviews indicate that the Studio Display is a fine display. While it costs similar to what a 27-inch, 5K iMac cost back in the day, with the latter having the price advantage of including a whole-ass computer, there’s still some value there for people firmly ensconced within the Apple ecosystem and want a quality display that’s not the Pro Display XDR and the eye-watering price that comes with it. The Studio Display comes with some innovative features that haven’t yet been seen in any display so far, thanks to the A13 SoC and whatever version of iOS its runs. Centre stage is cool, I’ve read that the speakers sound great, and perhaps most importantly, it probably won’t have the same quality and reliability issues that have plagued the UltraFine 5K, despite the latter being a much simpler display without the bells and whistles of the Studio Display. It turns out that if you want reliability, you strap an iPhone to the display and call it a day. Hey, if it works, it works.

But it’s not for me. A lot of people have been wondering if Apple would ever get back into the display game, and now they have, I’m not so sure that Apple would ever make a Retina-class display for me, someone that wants a quality panel without all the bells and whistles.

I’ve been thinking about upgrading my display for a while now. I’ve had a Dell P2715Q since late 2014, and it’s probably about time I started thinking about my next display. While my dream display — 4K or higher res, 120Hz or higher, and IPS HDR or OLED HDR, doesn’t exist yet, it’s getting close to that time I want something better.

I’d like a Retina-class display as much as the next guy. My primary computer is a Mac, and a 5K, 60Hz display could easily be suitable for both general computing and some gaming, just like my 4K 60Hz is currently. But my choices are either an UltraFine 5K, or Apple’s Studio Display, and neither of those can be had for under $1800. And plus, it just wouldn’t feel like that much of an upgrade for that kind of money. The only real thing they’re offering that my current Dell can’t is higher pixel density.

So what’s the alternative? Thankfully, 4K 144Hz HDR displays are becoming more and more common, and if you’re looking in the 27-inch sweet spot, there are quite a few options.

Continue Reading →

Display thoughts

For this photo, I tried to mirror the image quality of the display as closely as possible.

For this photo, I tried to mirror the image quality of the display as closely as possible.

I’ve been thinking about pulling the trigger on a new display. Not because there’s anything wrong with my current one, but after the kerfuffle that was made by Dota 2 players at the Shanghai Majors over not having 120Hz monitors to compete on, I figured I wanted to see what all the fuss is about.

(There’s also the vain hope that it will somehow improve my game by a few percentage points, but that’s a story for another time.)

A little back story: since December 2014 I’ve been running with a Dell P2715Q, a 27-inch, 60Hz, 3840×2160 IPS display that was a substantial upgrade from the U2711 display I had previously. It’s pretty nice, with a few caveats: since my primary usage is with the display attached to my MacBook Pro, running it a native res means things get pretty unreadable unless I’m pumping up the size of everything. It’s fantastic when using a scaled resolution (I use a tool called EasyRes to switch between resolutions quickly), as it gives the quality of a “Retina” 2560×1440 display (3840×2160 downscaled to half that), making everything as crisp as the freshest iceberg lettuce.

But I don’t usually use it at native res, because things tend to slow down a bit, and the fans are audible all the time. I bought the best graphics card that Apple offered at the time, so maybe the Oculus CEO has a point when he says he’ll offer VR on the Mac when Apple decide to put a powerful enough GPU in their machines. (Stringent heat and power requirements mean that probably won’t happen in the MacBook Pro lineup anytime soon, as much as it pains me to say that.)

So I run my wonderful series of pixels at a non-Retina 2560×1440 when plugged into my Mac, even though text looks worse that way, and I have no more screen real-estate than I did with my previous screen.

My PC is a different story entirely. I like to think I have a pretty great graphics card in the GTX 980, which lets me run whatever resolution I like a a near-constant 60 FPS. And because I hardly play anything other than Dota, which runs on the Source 2 engine, it means I can run that game at the native res of my monitor without getting any noticeable frame-rate drops. Newer games like Dragon Age Inquisition, Fallout 4, or The Division are more of a toss up – I can either choose between maxing all the settings at a lower resolution, or turning down the fanciness for more resolution, and what’s “better” mostly depends on the game.

Continue Reading →

A Little Bias

For the past few months now, I’ve been experimenting with something called bias lighting for my computer displays. All the cool kids are doing it, so I thought I would do the same.

Now it’s gotta be said that I spend what probably amounts to an unhealthy amount in time on front of LCD displays, if I’m not looking at my two LCDs on my desk, I’m staring at my iPhone on the bus, in the street, in the car, wherever.

The vast majority of my time, though, is spent in front of my displays at home: a decently-sized Dell 27-incher, and the 15-inch LCD of my MacBook Pro. They’re not the best match-up size wise, but going back to a single display when I’ve been using two for the majority of my computing life would be painful. There was a period where I went back to one due to reading something about single-displays being more productive. Needless to say, that experiment didn’t last very long — but I digress.

The theory behind bias lighting is that it’ll increase the perceived contrast of the display, as well as relieving eye-strain. It has a few other effects as well but those two are the main ones I’m really interested in, particularly as the lights in my room stay off for the most part (yes, my LCD tan is working out very well, thank you).

So I guess the question you’ve all been waiting for: how well does bias lighting work in practice?

The answer? I’m not exactly sure. Like I said, I’ve been using it for a couple of months now, and there’s definitely no discernible difference. Perhaps my piddly little 6-LED strips aren’t bright enough to have an impact on my gargantuan 27-inch display, perhaps I’m sitting too close to the monitor for them to make any kind of a difference, or perhaps I was expecting too much out of bias lighting in the first place.

Perhaps I’ll notice a difference when I turn them off for a month or so – but that’s for another time.