My New Year’s resolution: 5120×2880
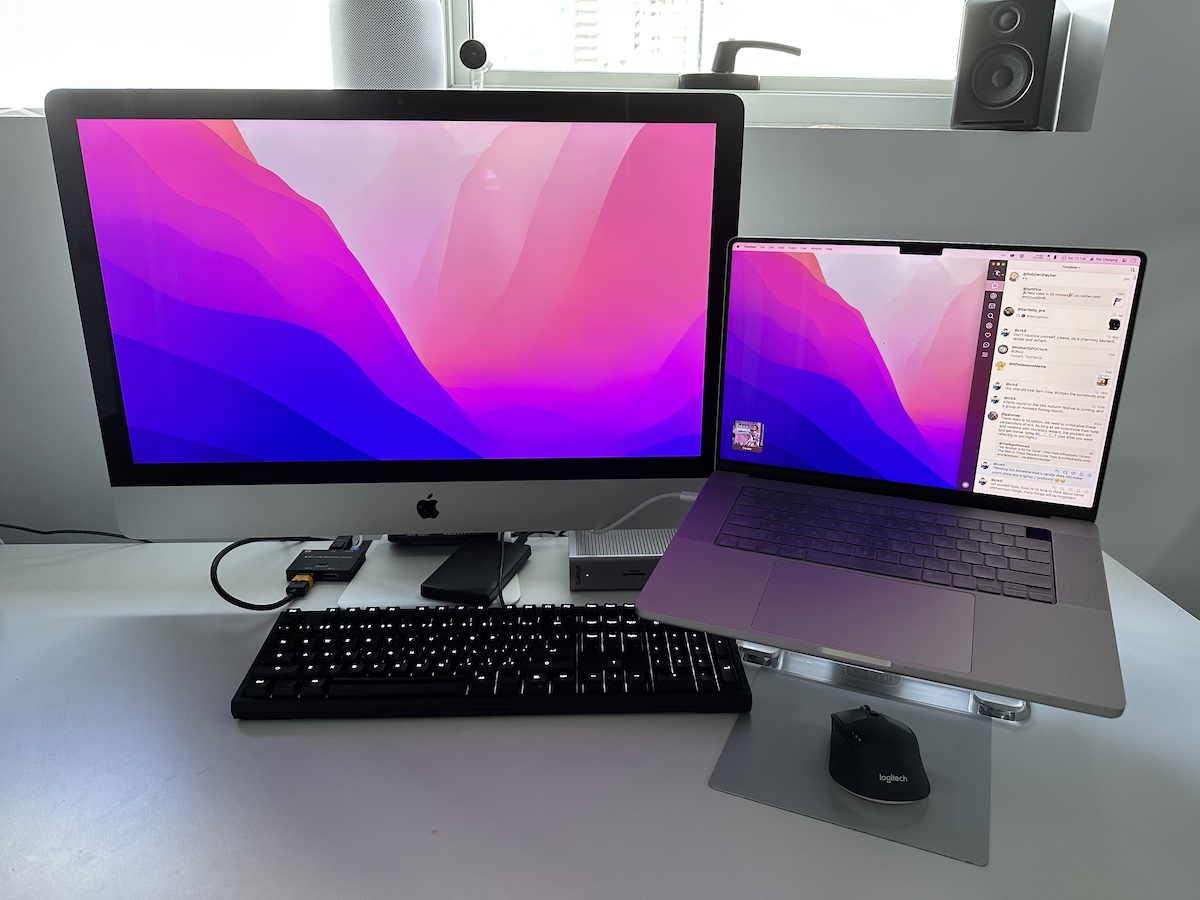
My current setup, 2023 edition
Alternate title: you want to experience true level? Do you?1
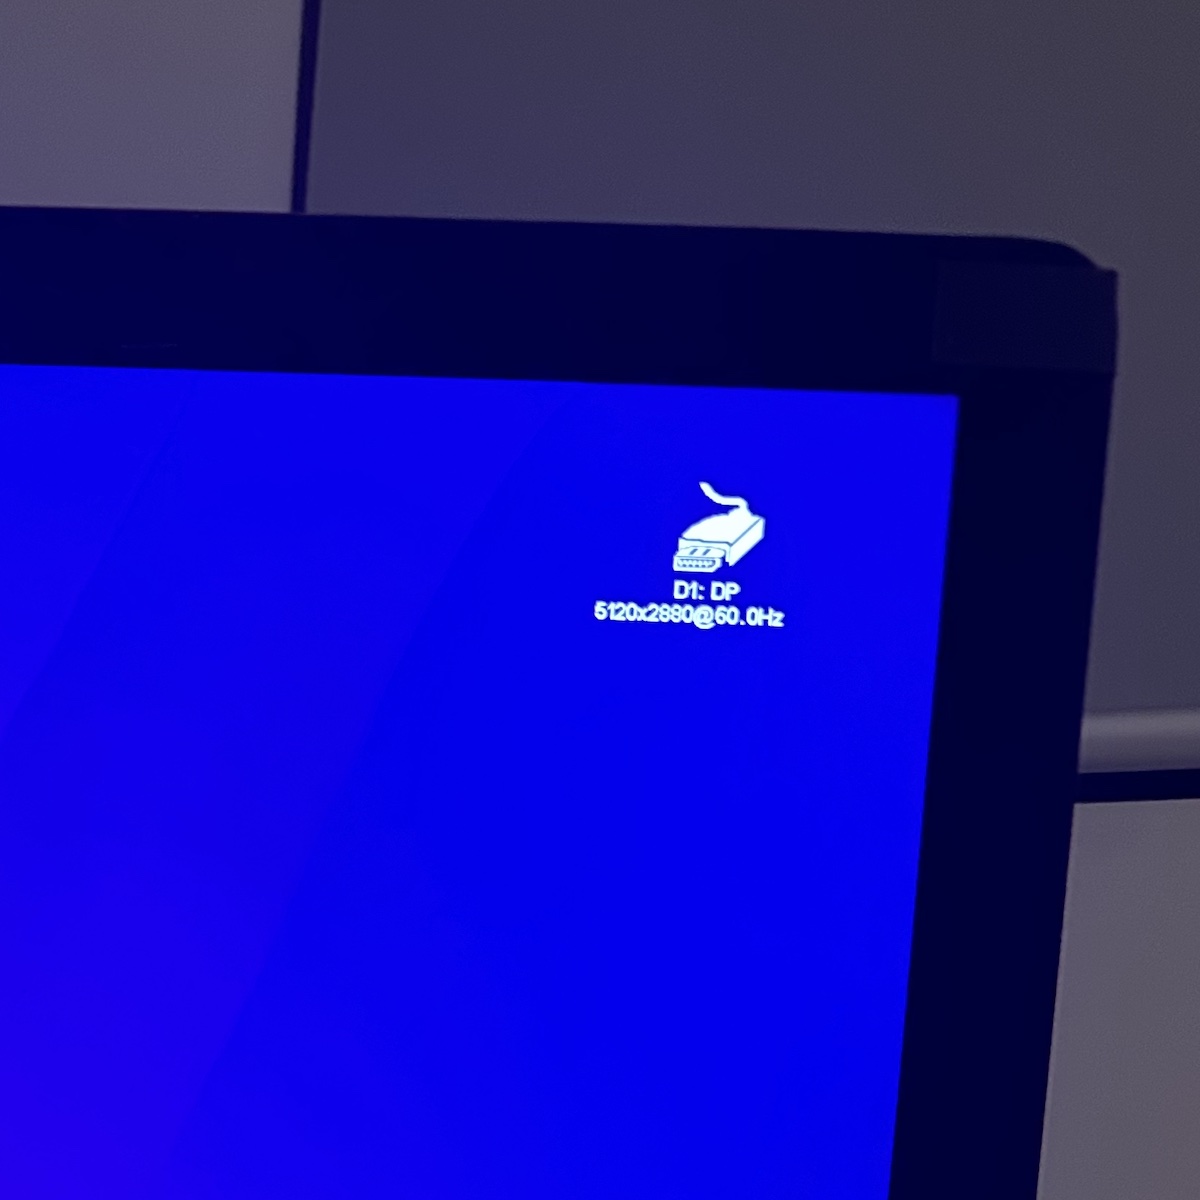
I have successfully converted a late-2015 27-inch Retina iMac into a standalone 5K display. After umm-ing and ahh-ing about it for a few weeks while I debated whether I wanted to potentially irreversibly disassemble a perfectly working iMac, I removed all the intervals of the iMac and replaced them with a 5K driver board that I bought from AliExpress, turning the whole thing into the cheapest standalone 5K display money can buy. Not to mention the only one that you can get that you can drive using regular old DisplayPort, no Thunderbolt required.
Why? All for an extra 55 PPI compared to readily available and much cheaper 27-inch 4K displays? Well, there are two main reasons you’d want to use a 27-inch 5K display compared to a 27-inch 4K one. But first, we need some Retina backstory…
Apple cops a lot of flack for introducing marketing terms without concrete technical specifications to back them up, and perhaps the best example of this is the term “Retina”. The Retina display article on Wikipedia actually has a pretty good explainer if you’re interested in the origin of the term, as well as what the derived definition is, based on what was said about it when it was first introduced with the iPhone 4, the first-ever Retina-class device. Remember, no concrete technical specs means we have to infer based on what we’ve been told at Apple launch events, but it seems to work.
The term Retina has been somewhat diluted now. A handful of prefixes and suffixes have been added to it to denote other variations on the theme, but whatever the marketing connotation, part of Apple’s theory behind Retina-class displays is that any display has to have a certain pixel density at a certain viewing distance, until you can no longer see individual pixels on the display. Obviously this assumes you have perfect eyesight, but putting that aside for the moment, for phones, that PPI figure is typically a lot higher than laptop or desktop displays because you’re typically holding your phone a lot closer to your face. That, in turn, means you need higher pixel density before you can’t discern individual pixels; hence higher PPI.2
You can do the maths yourself using any freely-available calculator, and Wikipedia has the actual formula. If you do, you’ll realise that theoretically, any display can be Retina if you’re sitting far enough away. For example, a 27-inch display using a very typical resolution of 2560×1440 is technically Retina from 80cm away. But I don’t know that many people who use their desktop displays from that far away, so not only do we have to start sitting closer, we have to go deeper into the Retina rabbit hole.
For simplicity’s sake, Apple also considers Retina to be a perfect multiplier of “standard” display resolutions. If we can’t change viewing distance in the Retina formula, we can simply put more pixels into the same space. By turning one pixel into four, quadrupling the total number of pixels and keeping everything else the same, that creates a sharper interface at the same physical dimensions. Earlier iPhones used a simple “2x” formula, with two times the number of pixels in both dimensions being four times the number of total pixels, but modern iPhones use a 3x scale which is nine pixels for every one on the original iPhone. For desktop displays, that means either doubling 1920×1080 referred to as 1080p or Full HD to give us 3840×2160 (4K), or doubling 2560×1440 (1440p) to 5120×2880 (5K). Apple refers to this as “HiDPI” mode.
What this means for us is that you can absolutely use a 27-inch 4K display in HiDPI mode, it will just look like a 1080p display, with four physical pixels representing every one. Which bring us to our first problem. If typical 1080p displays are usually in the 20-24 inch range, using a 27-inch display that looks like 1080p is too much physical screen for how much virtual screen real estate you get. Everything looks too big, which is where the magic of display scaling comes in.
But now we’ve introduced a second issue! Yes, you can use a scaled resolution on your 27-inch 4K display. Instead of the “native” pixel-doubling that you would get by using 3840×2160 physical pixels to represent 1920×1080, you can change the resolution of your external display up to 5120×2880 virtual pixels (which corresponds to a native pixel-doubling of 2560×1440), but then downscaling it to fit on the real 3840×2160 pixels that your display has. Doing so works, and fixes our issue of everything being too big, but this comes with its own set of issues, as per Bjango:
However, display scaling comes with some significant caveats, including a blurrier picture, shimmering when scrolling, moiré patterns, worse GPU performance, and worse battery life if you’re using a laptop. Display scaling also undoes dithering, which can mean gradients aren’t as smooth. With those issues in mind, it’s far, far better to run macOS at the pixel density it was designed for.
Check out their pictures and GIFs at the link, and you’ll be able to see the difference. Some of those issues aren’t as significant as others, but the biggest one for most people who care about this sort of thing is how using a scaled resolution makes your whole display look less crisp.
The magic numbers: 5120×2880
Can you tell the difference in real life? On an actual display? Yes, but how much it bothers you is up to you. In terms of display sharpness, I think we’d all agree that using a perfectly-doubled resolution is best, followed by native pixels, then scaled resolutions. The problem with using native pixels at 4K, though, is unless you have a physically larger monitor like a 40 inch display, everything is far too small to read at normal viewing distances. And if you’re using a scaled resolution, because the pixels don’t map perfectly to their physical equivalents, everything gets… imperfect. I’d hesitate to call it blurrier, because I don’t think blurrier is a word that can be used to describe HiDPI mode in general, but it’s certainly less sharp than the alternatives. It’s a pretty minor nitpick overall, but if you have a Mac and a 4K display, you can easily see the difference for yourself.3
While the obvious solution to this 4K-at-27-inches problem might seem like a smaller 4K display, say in the 20-24-inch range that would make it match up to its non-Retina 1080p counterparts, they’re even rarer than 5K displays. There have been a couple; LG’s UltraFine 4K display used to come in a 22-inch size, but is now only available in a 24-inch version that by all accounts is worse in every respect than its smaller, now discontinued, predecessor. Like LG’s UltraFine 5K, both of the 4K versions also worked using a Thunderbolt connection, not a DisplayPort one, but the better, more reliable 22-inch version is super rare these days and commands a premium on the second-hand market.
So what was the point of all this? Did I really spend a couple hundred dollars to see for myself if using a resolution of 5120×2880 (the HiDPI version of 2560×1440) scaled down to fit on 3840×2160 physical pixels was that much worse in terms of image quality and sharpness, especially when looking at text?
Yeah, I guess so.
And what conclusion did I come to? You can absolutely see the difference, but like I said, how much it bothers you depends on a lot of factors. Even if you know there’s a difference, even if you can see the difference when you’re looking for it, it’s absolutely possible to get used to it and not know any better. Until you switch your display back to being perfectly-pixel-doubled, at which you’ll wonder how you ever put up with the imperfections of a scaled resolution. As someone who doesn’t have perfect eyesight and wears glasses, even I can tell that the perfectly-pixel-doubled resolution is clearer and sharper than the scaled version. A 5K panel at 27 inches doesn’t have the same issue when using a 2560×1440 resolution in HiDPI mode.
True level, bitch.
Would I do it again? Yeah, probably, but only if I could pick up a for-parts iMac for cheap. I was lucky getting an iMac, for so cheap, in such good physical condition, but it turns out that’s only half the story. If the panel has issues like image retention, an uneven backlight, or even discolouration on the edges, then that’s going to severely degrade the experience of having a 5K display, because the whole point of the exercise is in the finer details. Otherwise you might as well just use a scaled resolution on a 4K panel and call it a day.
While my particular iMac was in near-perfect physical condition, it was apparent after using it for a while that it had some image retention issues, particularly around the edges of the display. Something must have happened during my disassembly of the iMac, too, because when I put it back together, the edges of the display now have a somewhat minor pinkish discolouration that runs along the entire perimeter of the display, something I didn’t notice when I was using it as an iMac (nor can I find any evidence of, based on photos I took when I was using it as iMac). Conjecture on the internet says this could have been due to me cleaning the edges of the glass display using isopropyl alcohol to remove leftover adhesive residue, even though where the residue sits on the very edges of the glass is maybe 3-4cm away from where the edge of the display is. Unfortunately, this isn’t something I can fix myself, and while I could replace the display, I think I’ve spent enough on this little side project for the time being.
Would I recommend others do the same, and convert their own Retina iMacs into standalone 5K displays? Probably not. Like I said, the difference between a 4K and 5K display is pretty small, basically non-existent if you’re using Windows, and 4K 60Hz displays are much cheaper than converting your own. Your converted standalone 5K probably has a much limited lifespan (and essentially no warranty) compared to any 4K you can buy new. But if you really want a glossy display, or your iMac was just going to end up in landfill anyway, then yeah, go for it. The whole process requires no soldering and only a little patience, so go for it.
If it was doing it again, here’s what I would do differently. Ideally, if I were doing the conversion properly I’d want to fabricate some kind of VESA-compatible mounting mechanism for the display component and driver board; mount the driver board to the back of the display assembly, then have some kind of VESA-compatible enclosure. The iMac chassis is OK, but only in the absence of anything better; there’s a lot of wasted space internally now that the thing doesn’t have to hold an entire iMac in there as well, and it’s obviously not compatible with VESA mounts, which I am 100% a convert for after getting my own VESA desk-mount monitor arms this year.
A custom enclosure would also make it easier to access the driver board. Because opening the iMac is a one-way trip requiring adhesives, anything that requires me to access the driver board at the moment has a high time and effort cost. The DisplayPort cable and power cable are basically permanent in the current setup, and replacing either requires opening the whole thing up.
So, am I going to keep using it as a standalone 5K display? Yeah, I think I will. Even with the image retention, even with the pinkish fringing on the edges, there’s nothing quite like having almost 15 million pixels on a glossy display. Even if it is only 60Hz! The pinkish hue is only really noticeable when viewing anything on a white background, which means viewing websites in light mode can be an issue. But you can’t see it if you’re using a different-coloured background or using dark mode. We’ll see how much it bothers me after a few weeks, or if I get used to it and the ultra-sharpness. Honestly the biggest problem is that I don’t have enough room on my desk for three 27-inch displays and my MacBook Pro, but I’ve rearranged by desk enough in the past couple of weeks, what’s one more time?
Plus, now I know — 5K displays are worth the money. Maybe not Studio Display-levels of money, but some kind of premium over their 4K counterparts.
Hopefully all of this puts to rest any kind of display-related shenanigans for a little while. There’s definitely some great display tech on the horizon, but until OLED or mini/micro-LED displays become affordable by mere mortals (or alternatively, justify their price tags with quality and features, an insane idea I know), that’ll have to do for now.
At least until high-refresh rate OLED panels with 4K or higher resolutions become a thing, anyway.
- Obligatory ↩
- If you’re interested, this rabbit hole goes deeper. Technically, what’s Retina for you may not be Retina for someone else, and why? Everyone’s eyesight is different. If you go even deeper into the rabbit hole, people start discussing whether it was Apple’s intention to define Retina displays based on whether someone can resolve certain details at certain distances, or whether it’s just another marketing term, but when terms like visual acuity, angular resolution, and arc-minute start getting thrown around, you know you’ve hit the bottom. ↩
- Interestingly enough, this display scaling doesn’t seem to be as much of an issue on Windows. For the longest time, Windows has traditionally had much worse display scaling than MacOS, but now it’s basically the same, at least where text is concerned. Apps can still have scaling issues, but they’re generally older and haven’t been updated in a few years. Doing a few quick tests with my Windows 10 gaming PC, I couldn’t see as much of a difference between the 150% and 200% when closely comparing text content. I suspect this is due to how Windows renders text, particularly how it uses a different text smoothing algorithm compared to MacOS. ↩